Showing posts with label Sizzix Dies. Show all posts

Sunday, August 2, 2015

Craft Room Studio Reveal

It is finally time to reveal my studio space. The room is small but it is the perfect size for me since I have a little bit of a lot of Stuff. The room is just off of my kitchen with French doors that lead out to the garden. My computer is off to the left. On the opposite wall are my 49 Junk Drawers which you can see a little part of here and here.
The image above is the right side of the room. The chair is a $5 thrifted treasure. The tilt bins along the walls were from a scrapbooking store that was closing many years ago. These hold ribbons and dimensional embellishments. There are 170 tilt bins.
This photo shows how small my space really is. Luckily, almost* everything fit. On the left of the desk is a vintage biscuit tin that hold my Grunge Paper and Grunge Board, larger stencils and thicker chipboard pieces. On the walls above my desk are my Elfa shelves from the Container Store. I installed these myself before I met Dear Handyman. They haven't fallen down yet! I realize that I have three types of projects that I usually work on; Scrapbooking, Upcycling and Altered Art. The bins on these shelves are labeled with these categories. I usually work with the French doors open so the bins keep out the dust.
The thing that finally made everything come together was when I moved my vintage cart into the room as a mobile work surface. On top is my paper cutter. My thin dies are organized on the middle shelf. My Sizzix, Fabi die cutter and autographed Vagabond are on the bottom shelf. FYI: I love the colors of the Fabi machine... aqua and soft grey, sweet! And it works exactly like a Big Shot or BIGkick machine but prettier.

Saturday, March 7, 2015

Tim Holtz and Pyrex in One Week!

This has been an awesome week which included a mini-workshop with Tim Holtz. He had us playing with all of his different surface materials to see how they perform. My absolute favorite was the Shiny Foil Transfer Sheets, the Distress Specialty Stamping Paper and Clearly for Art {moldable plastic film}.

He explained the surfaces and then let us play. We weren't supposed to create a final project but I ended up composing this quick piece using the Sizzix Layered Bee die and Texture Fade. Behind the large bee is a stamped butterfly using the gold transfer foil. The horizontal band is a piece of thin wood. The center of the background is embossed vellum. All of this is mounted on corrugated paper.
But wait! There's more fun to this week!

Monday, January 12, 2015

Foxy iPhone Tote

Since I was attending the Craft and Hobby Association trade show, I needed a simple way to carry my iPhone so that it didn't get lost with the bags of giveaways that one tends to gather at these shows.

I decided that I needed a simple pouch that I could clip to my ID lanyard. To keep it simple, I made it out of thrifted felt and my Fox die.
The dark pink pouch is a piece of felt cut to 4" x 12". The scalloped, light pink edge was die cut using the Scallops On the Edge die.

Saturday, November 8, 2014

Good News: Creative Life Update

I haven't posted anything creative or thrifty in quite a while but that is only because I haven't had time to create or thrift in quite a while. Sometimes the Universe just throws so much at you all at once and things just have to fall off your plate.

My Life in Brief:
Work: Finally got a promotion! It is doing all of the same things I was doing before but now getting a bump in salary. Woo hoo! I tend to take on any impossible project they think up and then get it done. A catalog created in 12 working days, Sales presentations with over 200 mockup packaging samples, A year's work of rebranding exercises... I'm on it!

Other Work news:


Design: My die designs were introduced at the Fall International Quilt Market. My Fox die was the Sizzix Number One seller at the show. My Monster die was number two.
My Reindeer die also sold out. {I created these examples of how to use my reindeer die. The top reindeer is me with the heart antlers. The left one is Dear Handyman. He's British so his antlers are a little different. The right one is my son who loves to tease Dear Handyman.}
Freelance: I have also been doing a massive number of freelance hours. I really enjoy my freelance. It is a great opportunity to do some creative designs but I can't share anything here. I can tell you that crafters love them. I just don't have my name on any of them but that is okay.

Thrifting: I've been to only a few estate sales but just haven't had the time to post anything new to my Stuff to Treasure store but it is still full of unique vintage treasures. The holidays are coming so you might find that perfect vintage gift for someone.

Personal: I am taking an emotional and mental break for a few days. I am being harassed by my Home Owner's Association which is stressful. Life is so crazy at times. When the Universe throws stuff at me, I need to stop taking it personally and just walk away. I am okay. People I care about are okay. Life is about the here and now and that is okay too.

Sunday, July 27, 2014

Paper Succulent Garden

What do you get when you combine the popular succulent gardens with the trend of decorating in creamy white color schemes and the desire to recycle thrifted treasures? The answer is a DIY paper succulent garden.

Tuesday, February 18, 2014

Belated Valentine's Post

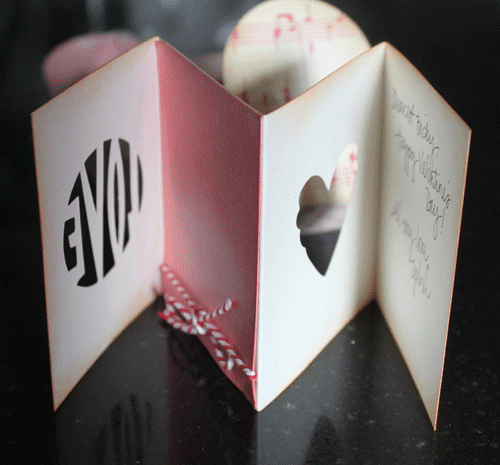
I made a Valentine's card for my Dear Handyman. He told me that he saves all of the cards that I make for him which makes me so happy.
I started with a box cut using the eclips machine. I made the flower using the Sizzix Tattered Pinecone die then inked and distressed the edges of the petals. I added a bit of lace, greenery and a small tag to finish off the front of the box.

When the box was opened there was a simple card.

I began with a 12" x 3" strip of cardstock and accordion folded it. I used the Alterations Magnetic Movers & Shapers Die; Love on the front of the card. This die is discontinued but I think it is so perfect for a simple card.
I kept the various panels very simple so that the shapes stood out.
I also used a Movers & Shapers Heart die on the inside page.

I'm so glad that my Dear Handyman appreciates the cards that I make for him. Just one more reason why I love him.

Saturday, October 26, 2013

Experimental Halloween Tags

Once a week I spend my lunch hour playing with the dies, inks, stains, paints, etc. in the art room at work. It is definitely one of the perks to working at a crafting company.

I have been experimenting with painting and inking a lot of tags and decided to use a couple of them to create some Halloween projects.

The Happy Halloween tag began with lots of Distress Paints and Stains in a variety of layers and techniques. Once I was happy with the look of the tag I used a thin sheet of scrap cardstock and die cut the word "Boo" using the Gothic Boo die by Sizzix. I sprayed the back lightly with adhesive to temporarily hold it in place on the tag. Next, I sprayed Perfect Pearls Heirloom Gold using the die cut shape as a stencil.
I wanted to experiment with Tim Holtz's new Framelits and Stamps so I used the Retro Halloween Set {the Owl} and Cobweb Blueprint Set {words "Happy Halloween"}. My only suggestion would be to use very dark ink if you are going to stamp on colored paper. Other than that these were super fun and easy.
Other shapes I used include the Bird Branch {I trimmed off the bird} and the Mini Owl and Crescent Moon {Moon only}. I adhered everything to the tag and love how the subtle shimmer of the Perfect Pearls makes it look like moon beams.

My next tag is a Pumpkin tag which began with a thick layer of Distress Paint so there would be brush strokes visible once it dried. I used Distress Stains and Distress Inks in a variety of Autumn colors and techniques on top of the paint. The darker colors made the texture stand out nicely.
I also splattered water to create droplets which is my favorite Tim Holtz technique.
After I was satisfied with the colors and textures of the tag I die cut the eyes using only the triangle eyes from the Sizzix Mini Scary Jack-o-Lantern Set and using the Base Tray.

The next part was an experiment that happily worked out as I had hoped. I cut the mouth by using the same Mini Scary Jack-o-Lantern die and Tray but instead of using a regular Cutting Pad, I used the Embossing Diffuser Set #2 so that I could control exactly where the die would cut.

I began with a regular Cutting Pad on the bottom, then the Base Tray with the Jack-o-Lantern mouth die only, next I placed my tag and finally an Embossing Diffuser insert piece placed over the upper part of the mouth die. I ran this through the Big Shot so that it only cut where the Embossing Diffuser insert piece was and this created a single jagged mouth cut across my tag.
To reassemble the two pieces, I tilted the bottom piece and stapled them together on one side.
As a final detail, I used Distress Inks to age a piece of green ribbon to use as a stem for my Pumpkin Tag.

This is linked to:
504 MainCommon Ground, HomeworkJust Us Four, Kathe With an E, Ladybug BlessingsMad in Crafts, Sew Much AdoSimply DesigningTatertots and Jello, The Crafty Blog StalkerThe DIY Dreamer and Whipperberry

Tuesday, October 22, 2013

Easy Halloween Lanterns

This is always a very busy time of year at work so I don't usually spend time decorating my workspace. But this year I thrifted a decorative lantern string with the perfect, quick and easy project in mind.
I began by die cutting cobweb strips using the Tim Holtz Cobwebs Decorative Strip by Sizzix. There are a ton of little pieces to punch out but the final effect is awesome.

Thursday, October 10, 2013

Haunted Country Cottage

Recently I was talking to the oh-so-talented designer Brenda Walton which got me thinking about her sweet and beautiful Sizzix dies. Brenda's style is very delicate and feminine with lots of pretty colors but with Halloween just around the corner I started thinking about how I could use her dies in a different way.
What could be better than using her beautiful Country Cottage, 3-D die to create a distressed Haunted Cottage. I began by cutting out the house shapes from a regular manila folder.

Next I used Distress Inks and Distress Stains to add colors to the various pieces. I wanted the walls to look like they were old and mossy.
I cut the roof shingles out of very fine sand paper which gave it a wonderful texture. I added a little Distress Ink to highlight the edges.
I cut the shutters out of a used corrugated coffee cup sleeve/holder. I seem to repurpose or recycle everything. Because this is a haunted house I didn't put shutters on all of the windows so that it would look unkept.
To give the Cottage a little more haunted feel, I die cut a couple of Ghosts using the clear plastic die packaging and glued them floating out of the top and front of the Cottage. I also added some Cobwebs under the eaves.
The final accent was some thrifted Spanish Moss around the base and an electric tea light for added character.

It was fun to turn Brenda's sweet and feminine Country Cottage into something creepy enough for Halloween.
Things are getting a little creepy around here.

I am honored to be Featured at:


This is linked to:

Tuesday, September 3, 2013

Designers Craft Connection Blog Hop September - Vacation Memories

Welcome to the Designers Craft Connection Blog Hop for the month of September. The theme this month is to display vacation memories and often these include souvenirs that are too bulky to fit inside a  scrapbook. I created a solution to hold all of the little things that make up vacation memories.
I love little drawers and I especially love when they are bright and colorful. I made these drawers using the Sizzix Box, Candy Drawer die by Eileen Hull. This works best using board stock but I wanted to use lots of my two-sided card stock in my stash. It worked well because I attached all of the boxes to each other so they have added stability. Plus I love the Summery colors of the papers.
I began by digging through all of my stash then die cutting and folding all of the pieces needed to make nine drawers. Once I decided how I liked the order of the boxes to appear I glued the adjacent sides and tops to form a stack of three boxes across by three boxes high. I used a 1/2" circle punch to create the finger hole on each drawer front.

I filled the drawers with little items that I've collected from various vacations over the years. I have squished pennies from lots of tourist locations, tiny sea shells from different beaches and stamps from around the world {mostly dream vacation spots}. I also included some items that I've collected while thrifting on vacations.

I used some small items as drawer pulls to highlight what is inside the drawers. A tiny sea shell and button add interest to the front of the drawers.

You can create a set of these drawers or keep adding to this group of drawers every season. This is such a fun way to organize little items. They hold fond memories of Summer vacations.

Please use the DCC blog hop button on the right to continue to get inspired by the many creative designers of the Designers Craft Connection blog hop.

This is linked to:
Lamberts Lately

Sunday, March 31, 2013

Designer Crafts Connection Blog Hop - April

Welcome to the Designer Crafts Connection Blog Hop for the month of April. This month's theme is "Handmade Flowers" with an added challenge to create with things around the house. A perfect combination that is dear to my heart. I started looking through my stash and came across something I had been saving for a "someday" project, the pretty fabric bag that held my shabby chic duvet cover.
The finished project is a canvas tote decorated with the Tattered Floral Sizzix die. The lining of my bag is the intact duvet cover bag {see the floral bag below}. For the outside of the bag, I used leftover painter's drop cloth from previous projects here and here. I first cut and sewed the drop cloth to match the size and shape of the duvet cover bag.
Next I die cut some Tattered Florals out of more drop cloth material and applied a little Worn Lipstick Distress ink on the petal edges. This created the outer part of my flowers.
I wanted to use a different material for the center of the flowers to add texture and interest. I found a vinyl bag of decorative sea shells sitting around. I cut a different flower shape out of the vinyl and used Cranberry and Butterscotch Alcohol Ink to color the narrower petals.
I used embroidery thread and thrifted pearl beads to attach the flowers to the bag. At this point the flowers started to look like climbing Clematis. Using Broken China Distress ink, I added a hint of blue behind the flowers to tie in with the colors in the lining.
I sewed handles and then stitched the bag together. This entire project was created using only items that I had around my house. I love doing projects like this.

I hope you enjoyed my Handmade Flowers. Please use the Forward/Back button on the right column to continue through the DCC Blog Hop for more amazing floral inspiration.

This is linked to:
DIY Home Sweet Home, Homemaker on a DimeMaking the World Cuter, Sew Can Do and Skip to My Lou

Monday, January 14, 2013

CHA Day 2 - New Products, Sweet Colors

I am normally a rather shy person but I have discovered an entirely different side of me when I am at the Craft and Hobby Association tradeshow. Maybe it is because I love the industry so dearly that I am not afraid to go up and introduce myself to people I don't even know.

There is just so much to see that I often forget to take photos. I found that I took an equal number of photos of displays as I did of new products that delighted me. So today's post will be about some new products and tomorrow I will share photos of how some booths were decorated using vintage treasures that are so dear to my heart.

I noticed that many of the colors shown could be described as "cheery vintage". This is the Vintage Market line from Sizzix. My friend Jen drew these amazingly sweet dies. There are button cards, old scales, Mason jars and many other designs. And my other friend Debi created the samples and styled the display. It is all so inspiring.
Another example of cheery vintage colors is this line from Cosmo Cricket. Wouldn't these chef images look great to decorate recipe cards! I loved the colors and retro images.
This is a line from Echo Park. I love the little girl illustration on the bottom left and the soft pastel colors. How sweet is this!!!
 These adorable baby lines are by Kaiser Craft. They look like sweet old baby cards.
If you follow Tim Holtz's blog then you know that he in introducing a line of stamps of sketched images for Stampers Anonymous.  Here is a display of some cards and tags made with those stamps.
And finally, with Valentine's day right around the corner I wanted to share these amazing Valentine's themed cards using Tim Holtz's dies from Sizzix.

Tomorrow I will share some of the vintage displays I found all around the CHA showroom. Vintage is still so popular.

Monday, December 3, 2012

Designers Craft Connection Blog Hop - December

Welcome to the Designers Craft Connection Blog Hop for the month of December. This month's theme is "Handmade for the Holidays".

I am excited about this month's theme because; 1) I love making things, 2) I love the holidays and 3) I had a perfect idea for a dual-purpose project.

My sister and I exchange handmade ornaments every year. This year our theme was "Something Made of Paper". So combining the themes I created a "Tim Holtz Cuckoo Clock" ornament.
I began by covering a small box with old sheet music. This happened to be from The Nutcracker Suite in case anyone happens to notice. Before I sealed up the box I punched two small holes in the bottom of the box and ran a small chain through it leaving both ends hanging out of the bottom. I sealed up the box and used Distress inks to age the paper edges.
Using all Sizzix dies, I die cut two Tattered Pinecone pieces and followed Tim Holtz's video to create the pinecones hanging beneath the clock. I added some snowy glitter using white glue.
I cut out a House, 3-D and used the Woodgrain Texture Fade for added dimension to the sides. Again, using Distress inks I highlighted the raised texture. I cut an opening near the top arch and attached a small die cut Cardinal {more festive than a Cuckoo Bird}. 
I die cut the Weathered Clock and first applied Tea Dye Distress ink as a background color. Next, I used Perfect Medium with an all-over pattern stamp and applied Perfect Pearls in Heirloom Gold. This created a random, worn metallic look to the clock face. Before assembling the clock/house I laid the clock face on the front and determined where the clock hands would be attached. I used a small brad to attach the hands then removed the clock face while I worked on the next steps. 
I assembled the clock/house and decided that it needed a roof. I folded a piece of brown cardstock and ran both sides through my Vagabond die cutting machine using the Snowflurries Texture Fade. I sanded the raised surface to give it more texture. I also added a small piece of die cut Vintage Lace along the front edge of the roof. It is cut from more old sheet music and left over from a previous project. It gave the house a gingerbread roof line. I used a large needle to punch two holes in the roof and top of the house. I glued the roof to the house then strung a piece of vintage ribbon through the holes.
I used hot glue to attach the house to the bottom box. I glued the clock face to both the house and the base. On the left side of the clock I added a small bottlebrush tree. On the right, I glued a small die cut Reindeer.

I hope you enjoyed my Handmade for the Holidays project. Please use the DCC Blog Hop button on the right to visit all of the talented designers and see their creative projects.

This is linked to:
Beyond the Picket FenceCoastal CharmElizabeth and Co., Making the World CuterMy Uncommon Slice of Suburbia, Savvy Southern StyleSew Can Do, Sew Much AdoSomeday CraftsSugar Bee Crafts, The Shabby Creek CottageThe Thrifty HomeThe Trendy TreehouseTopsy Turvy and Twin Dragonfly Designs
Related Posts Plugin for WordPress, Blogger...