The image above is the right side of the room. The chair is a $5 thrifted treasure. The tilt bins along the walls were from a scrapbooking store that was closing many years ago. These hold ribbons and dimensional embellishments. There are 170 tilt bins.
The thing that finally made everything come together was when I moved my vintage cart into the room as a mobile work surface. On top is my paper cutter. My thin dies are organized on the middle shelf. My Sizzix, Fabi die cutter and autographed Vagabond are on the bottom shelf. FYI: I love the colors of the Fabi machine... aqua and soft grey, sweet! And it works exactly like a Big Shot or BIGkick machine but prettier.
To organize my thin dies I bought Avery/Elle pocket folders. I cut magnetic sheets into 5"x7" pieces {I used an Xacto knife on the magnetic sheet so as not to damage my paper cutter} and organized my dies according to similar shapes. I don't have to keep track of the names of the sets so I just put similar shapes together but you could organize these any way you want. I then used some thrifted old drawers to hold them. I also have some stamps and dies in these pockets as well.
My paper Stash fit into four groups. The top right drawer is closest to my working surface so I have my solid colored card stock which I use most often. The other top drawer is organized by my three favorite manufacturers: Basic Grey, October Afternoon and Cosmo Cricket. I have some old Stash that I love in there.
The bottom right drawer is organized by patterned colored paper and then themes. The bottom left is a continuation of themes: Holidays, Outdoors, etc. The best part is that they won't get dusty.I also have Alex drawers from Ikea. These hold larger groups of things such as adhesives and ink pads. The nice things is that it can be rolled out to use as an extra work surface.
On the right side of the desk is a lower cupboard that holds Project folders. I grouped papers together that I plan to use on a large single project such as my Heritage album. The drawers above are empty for now. I think that I may need to buy a different configuration of drawer to hold my alphabet stickers.
I did only two major changes to my studio for this reorganization project. The first was the addition of the Go-Organize drawers. The second was adding pull-out drawers to the tall Ikea cabinet that used to hold household items.
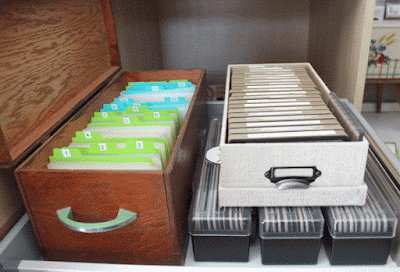
One pull-out drawer holds embossing folders, Decorative Strips dies and On The Edge dies. The wooden box on the top is a thrifted thread spool display but it worked perfectly to hold smaller embossing border folders.
To create the tabs, I bought five plastic folders from Walmart.
I cut them {again I used an Xacto instead of a paper cutter} to 6 inches wide {the width of the die} and as tall as I needed plus 3/4 inch on the longer side for the tab. Next I used my On the Edge, File Tab die by Sizzix to cut tabs on the long edge. I realized that I couldn't always line up the plastic with the top of the tab blade so I added a piece of Washi tape on the die to help me visually align things better. I also taped the plastic to the die before running it through the machine so it stayed in place.
As a final step, I rounded the corners to give it a finished look.
Those were for my embossing folders. I had lots of smaller plastic pieces left over so I cut them to fit my pocket cards and organized these as well. The green tabs are for pocket cards in the following categories: Bubbles {thought bubbles}, Grids, Images, Journaling cards {empty}, Journaling Cards {with words}, Lists, Love, Month/Day/Year, Seasons, Symbols and Words. The blue tabs separate colors. When I purged my paper Stash, I cut some into 3x4 sizes and filed them under the colors. I got the idea for the categories from an online video and apologize for not remembering the name of the originator.
The bottom drawer holds my Alterations dies. My other Sizzix dies are in the corner cabinet above my desk. I also keep all of my cutting pads and platforms here. Below this, at the bottom of the cabinet, is where I store my sewing machine and a Cropper Hopper box full of alphabet stickers for now.
*And finally, a full disclosure seems appropriate here. I said that "almost" everything was put away. I still need to find space for my eClips {the Silhouette is being retired}. Plus, under my desk is a large Cropper Hopper box and a white file folder box.
I still need to organize other parts of my room but at least I can find most of my supplies quickly and easily. The best part was that I purged so much in the process. It makes me feel so happy to work in this room now.
Thank you so much for reading through to the end of this long post. Happy crafting!


Wow! You have created a wonderful work space - definitely perfect for creating. Love your fun red cart! Jane
ReplyDeleteI really appreciate this wonderful post that you have provided for us.
ReplyDeleteI feel strongly that love and read more on this topic. I have spent a lot
of my spare time reading your content. Thank you a lot.
Click here to chceck my blog :: 풀싸롱
(freaky)
ReplyDeletepitbull puppies for sale
pitbulls for sale
pitbulls for sale
Glock 17 for sale cheap online without License overnight delivery (glockgunstore.com)
glock 30 for sale
Mp7 for sale
uzi for sale
Browning Hi-Power 9mm