Showing posts with label Easter. Show all posts

Sunday, March 29, 2015

Painted Gold-Trimmed Easter Eggs

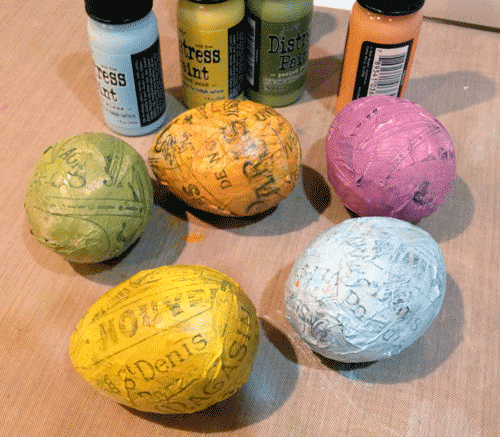
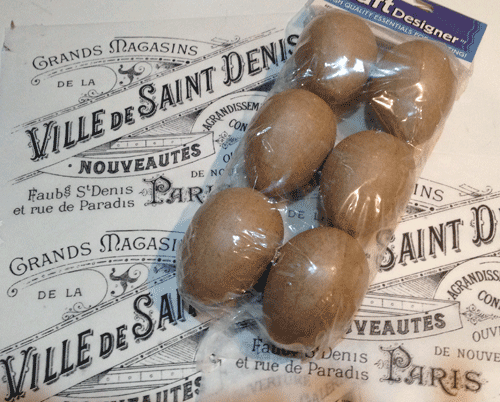
Easter is just around the corner and I finally had a chance to design some Easter Eggs. I wanted to use some paper maché eggs that I had thrifted and to try using a rather unusual collage material.
I began with some lovely French images from the Graphics Fairy. Now here is the unusual collage part, I had some {unused} toilet seat covers that were not properly die cut so as to make them impractical for their intended purpose. These were to be discarded from the office so I saved a couple of sheets to experiment with. I trimmed a seat cover into an 8" x 10 1/2" sheet and taped the corners to a standard piece of printer paper. I ran this through my inkjet printer to transfer the French graphics onto the very lightweight tissue surface.
I tore small sections of the tissue and used Mod Podge to create a collage on the eggs. I had to be careful because the tissue tends to disintegrate with moisture.
After the eggs were dry, I applied a light coat of Distress Paint.
To add some interest to the painted surface, I doodled on each egg using gold Sizzix InkSheets. I also added some gold ribbon, washi tape, lace and vintage buttons to finish off each egg.
This was the first time that I used the InkSheets and I could see some fun possibilities. I also learned that it is possible to print on very thin tissue. If you try using either technique, please add a comment and let me know what you think. Hope everyone had a fun weekend.

Sunday, April 3, 2011

Designer Crafts Connection Blog Hop - Easter

Welcome to the second Designer Crafts Connection Blog Hop. This month's theme is Easter or Spring.

I do a lot of thrifting and a lot of crafting and wanted to create an upcycled Easter Egg project. Everything here is thrifted.

These eggs were created first using plastic Easter Eggs as the foundation. I hot glued on various sizes of white buttons, allowing the color of the plastic egg to show through. This is a great way to use tiny white buttons.

Next, I wrapped vintage lace around the middle and tied sheer ribbon in various shades of pastels. As a final touch, I added vintage embellishments of a rhinestone earring, millinery flowers and an old key.

These are displayed on painted wooden pieces that I thrifted here. After painting the wood I lightly sanded them to give a more distressed appearance.

I have been creating all kinds of unique Easter Eggs for the past few weeks so please check out my Easter {Sewing} Basket and Tissue Paper Eggs before continuing through the blog hop using the Designer Crafts button on the right. Thanks for visiting and I hope you enjoyed this project.

I am thrilled to be featured at:

Pedacinho de Mim.

High Heels and Lattes:


High Heels and Lattes

Rook No. 17:

Photobucket


Passionately Artistic:


Buttons Galore and More:

Thank you all!!!!


This is linked to:
A Little Knick Knack, All Thingz Related, Baked by Joanna, Between Naps on the Porch, Beyond the Picket Fence, Blue Creek Home, Blue Cricket Designs, Brambleberry Cottage, Chic on a Shoestring, Coastal Charm, Common Ground, Decor to Adore, Fave Crafts, Finding Fabulous, House of Grace,  I {heart} Naptime, I'm Topsy Turvy, Inspiring Creations, Just a Girl, Keeping It Simple, Krafty Kat, Lovely Crafty Home, Making the World Cuter, Marvelously Messy, My Romantic Home, My Uncommon Slice of Suburbia, Paisley Passions, Passionately Artistic, Rook No. 17, Running With Glitter, Savvy Southern Style, Simply Designing, Someday Crafts, Somewhat Simple, Tales from Bloggeritaville, Tatertots & Jello, The Blackberry Vine, The DIY Home Sweet Home Project, The Girl Creative, The Shabby Chic Cottage, The Shabby Nest, The Thrifty Home, Trendy Treehouse, Truly Lovely, Under the Table and Dreaming, Very Merry Vintage Style and What Allie's Making Now

Sunday, March 27, 2011

Easter {Sewing} Basket

Here is another different way to display Easter Eggs.

I began with thrifted plastic eggs, lightly sanded and painted with white acrylic paint. After they were dry I used strips of thrifted sewing patterns and Mod Podge to décopage the eggs.

They are displayed in a thrifted sewing basket with "grass" that is actually an old, green, knit sweater that I unravelled.

I am thrilled to be featured at Marvelously Messy.


A Marvelous Mess


I am also honored to be featured at Krafty Kat.
WWFB


This is linked to:
A Little Knick Knack, All Thingz Related, Baked by Joanna, Between Naps on the Porch, Beyond the Picket Fence, Blue Cricket Design, Brambleberry Cottage, Chic on a Shoestring, Coastal Charm, Common Ground, Fave Crafts, Finding Fabulous, Hey What's For Dinner Mom?, House of Grace, I {heart} Naptime, I'm Topsy Turvy, Just A Girl, Keeping it Simple, Krafty Kat, Lovely Crafty Home, Making the World Cuter, My Romantic Home, My Uncommon Slice of Suburbia, Paisley Passions, Passionately Artistic, Rook No. 17, Running With Glitter, Savvy Southern Style, Simply Designing, Skip to My Lou, Someday Crafts, Somewhat Simple, Tales from Bloggeritaville, Tatertots and Jello, The Blackberry Vine, The DIY Home Sweet Home Project, The Girl Creative, The Shabby Chic Cottage, The Shabby Nest, The Tattered Tag, The Thrifty Groove, The Thrifty Home, The Trendy Treehouse, Truly Lovely, Under the Table and Dreaming, Very Merry Vintage Style and What Allie's Making Now

Sunday, March 20, 2011

Easter Egg Display "Thing"

Spring is here and I have been decorating Easter Eggs.

I used real eggs with the center blown out. This is real old school crafting. (You can use plastic eggs and prepare them by first, lightly sanding and then painting them with white acrylic paint.) Next I tore pieces of colored tissue paper and applied them to the shells using liquid laundry starch (you can probably use Mod Podge.) The colors from the tissue paper are so intense when applied to a white background and the starch will blend the colors.

My dear boyfriend came up with the brilliant idea of displaying them in the shabby chic "thing" that I thrifted yesterday. I padded each section with thrifted Spanish moss and set the eggs inside.

Regarding the display "Thing", several people commented on yesterday's post suggesting to use it to display Easter Eggs. I have to admit that I was thinking vintage Christmas ornaments instead of the obvious Easter decorations. Also, Mrs BC commented that the "Thing" is called an "apergne" and with a little additional research I found that it might be an "epergne". It is not as refined as the beautiful ones I found online but maybe it was a garden display version. Thank you Mrs BC for the clue.

Whatever it is called, it has turned out to be a fun decorative piece.

This is linked to:
A Little Knick Knack, All Thingz Related, Baked by Joanna, Between Naps on the Porch, Beyond the Picket Fence, Blue Cricket Design, Brambleberry Cottage, Chic on a Shoestring Decorating, Coastal Charm, Craft Envy, Fave Crafts, House of Grace, I {heart} Naptime, Lovely Crafty Home, Keeping It Simple, Krafty Kat, Making the World Cuter, Marvelously Messy, My Backyard Eden, My Romantic Home, My Uncommon Slice of Suburbia, Paisley Passions, Passionately Artistic, Rook No. 17, Savvy Southern Style, Simply Designing, Skip to My Lou, Someday Crafts, Somewhat Simple, Tatertots & Jello, The Blackberry Vine, The Girl Creative, The Shabby Chic Cottage, The Shabby Nest, The Thrifty Groove, The Thrifty Home, The Trendy Treehouse, Truly Lovely, Under the Table and Dreaming, What Allie's Making Now and Wildflowers and Whimsy
Related Posts Plugin for WordPress, Blogger...