I am thrilled to say that I have reached 100+ Followers! I want to thank all of the wonderful people who stop by and follow my blog. To show my appreciation I decided to have a giveaway (my first).
But then I realized that my blog interests people from two slightly different groups. I have my crafting Followers that visit for my projects. And I have my thrifting Followers that visit to see what treasures I find. I had to think of a giveaway that would interest both groups. I finally decided to put together a collection of vintage ephemera that might be a worthy thank you gift for either group. And depending on if you are a Crafter or a Thrifter that wins, I will add a little extra something that you would like.
Included in this packet of Vintage Ephemera are the following:
Packet of 100 NuAce photo mounting corners, unopened
Bingo cards
Handle With Care stickers
Gerber Baby Foods Shopping list
Gerber Delicious "Main Dishes" pamphlet
Assortment of International postage stamps
Large Letter Linen postcards
Original Japanese painting (about postcard size)
Pirate party mask with illustrations on the back
Several yards of vintage lace
Misc. note papers
Vintage buttons
Wooden Bingo numbers
Everyone has two chances to enter this giveaway. If you are new here then leave one comment on this post to enter. And if you become a Follower then leave a second comment letting me know that you have become a Follower (total of two chances to win). If you are already a Follower then leave two separate comments (one stating that you are already a Follower and a second comment to enter.) This way everyone will have two chances to win if they are a Follower (hope this makes sense).
I'm going to let this be an international giveaway because there are some really nice Followers as far away as Denmark and I don't want them to miss out.
I will have this giveaway open for one week, ending March 9 at 7pm Pacific time. At that time I will select a winner. Good luck and THANK YOU to all of my wonderful Followers.
Wednesday, March 2, 2011
Tuesday, March 1, 2011
Stylish Blogger Award... WOW!
I am so honored to be awarded with the Stylish Blogger Award from the talented ladies at Coffee @ 3. How exciting this is for me. I could ramble on but let's just say I am pleased and honored.
So now it is my turn to select eight wonderfully stylish blogs and honor them with a Stylish Blogger Award. If you are one of the winners listed below then here are a few rules to follow when you accept this award:
1. Thank and link back to the blogger who gave you the award
2. Share 7 things about yourself
3. Award 8 recently discovered bloggers
4. Contact Bloggers and inform them of their awards
So without further delay, here are the eight blogs that I think are deserving of a Stylish Blogger Award.
Ruffled is self-described as a "Wedding blog for vintage, indie and DIY brides". But it is a wonderful, visual treat to see beautiful photographs, vintage treasures and clever, handmade decorations all in one place. This is a treasure trove of party and decorating ideas as well as lovely tablescapes.
So now it is my turn to select eight wonderfully stylish blogs and honor them with a Stylish Blogger Award. If you are one of the winners listed below then here are a few rules to follow when you accept this award:
1. Thank and link back to the blogger who gave you the award
2. Share 7 things about yourself
3. Award 8 recently discovered bloggers
4. Contact Bloggers and inform them of their awards
So without further delay, here are the eight blogs that I think are deserving of a Stylish Blogger Award.
BLOG #1
RuffledRuffled is self-described as a "Wedding blog for vintage, indie and DIY brides". But it is a wonderful, visual treat to see beautiful photographs, vintage treasures and clever, handmade decorations all in one place. This is a treasure trove of party and decorating ideas as well as lovely tablescapes.
BLOG #2
A Creative MintA Creative Mint will make you gasp at how beautiful simple things can become in the hands of an artist. Leslie creates color boards that are so stunning and takes photos that are so beautiful. She raises the bar on what a stylish blog should look like.
BLOG #3
Miss Mustard Seed is a fabulous blog about interior decorating and refurbishing vintage finds. She does some amazing transformations of furniture. I also love the graphics on her blog which give it a vintage feel without going over the top.
BLOG #4
I'm just a vintage groupie and I love the treasures Amy finds. Besides seeing all of the cool vintage things, I enjoy her writing style. I like her sense of humor. And I like her taste in vintage.
BLOG #5
I adore Selena's blog. Not only does she have a Linky party for everyone to share their fabulous thrifting finds, but she is also so generous to share her tips on conducting a reselling business.
BLOG #6
Almost, but not quite, too pretty for words. The photos here are like candy for the eyes. Lots of inspiration.
BLOG #7
A thoughtful blog written by two women who live 3,191 miles apart. They post photos of their daily lives as viewed from both sides of United States. A beautiful blog that makes you stop and smell the roses in your own life.
BLOG #8
Everything Lori creates is adorable. I especially love her Tiny House. Another creative and inspiring blog.
So those are my eight winners of the Stylish Blogger Award. It was difficult to select just eight but these are all stylish, inspiring and entertaining. Now, on to...
SEVEN RANDOM FACTS ABOUT ME
1. I have a wonderful grown-up son and a super-special English boyfriend. Both of these men make me laugh and bring so much joy into my life.
2. I am a graphic designer for a paper crafting company. I design packaging, catalogs and advertising (the ad that I designed for the Tim Holtz Vagabond die cutting machine was in Scrapbooks Etc. recently).
3. I started my blog because I didn't want to waste my evenings watching TV. I like making things and it feels good to be productive.
4. As a child, I remember going to thrift stores with my mother. I have since inherited boxes of vintage treasures as well as some true antiques. All of that and I still go out looking for more vintage treasures.
5. I don't like to cook.
6. Things I have crossed off of my Bucket List: Helicopter flight over Manhattan, "Flying" in a vertical wind tunnel (not recommended), Scuba Diving in Hawaii, Seeing my favorite British actor perform in Hamlet (flying out in the morning, catching a matinee and flying back the same day), Learning to ride a horse... the list goes on.
7. Words that inspire me to do more: "When was the last time you did something for the first time?"
Congratulations to all of these amazing bloggers. Thank you for your inspiration and generosity in sharing your talents. Remember to follow the rules listed above. And again, I want to thank Lauren & Michele from Coffee @ 3 for honoring me with this Stylish Blogger Award. Thank you.
Sunday, February 27, 2011
St. Patrick's Day Rosettes
A bright shade of green always reminds me of Spring and I'm ready for Spring.
I gathered up lots of scraps of various shades of green paper and die cut them using the Sizzix, Paper Rosettes die. I also die cut several Scallop Circles #2 to add some variation.
I created larger rosettes by doubling-up the Rosette strips (see tutorial below). I printed out the sayings on my computer and used a circle punch. I glued everything together and wanted to find a unique way to display them for St. Patrick's Day.
I recently thrifted some silver sugar bowls and had several mis-matched lids. I used 26 gauge, silver wire (24 gauge might have been better for more stability) and wrapped it around the knobs on the tops of the silver lids. Next I worked the wire until I had a nice, wide arc and used some pliers to create a hook on the end.
I punched a tiny hole in the rosette and balanced them on the hook above the silver lids.
Now all I have to do is wait for St. Patrick's Day.
HOW TO MAKE EXTRA-LARGE PAPER ROSETTES:
To create the larger Rosettes you will need to die cut two pieces (step 1). Glue them together leaving about 1/4" overlapping (step 2). Accordion fold in the same way as a regular-size Paper Rosette (step 3). Glue the ends together to create a tube (step 4). Following the instructions for a regular-size Paper Rosette, gather the ends and gently press down to fan out the sides. You will need to do this part very gently because the outer edges are being stretched and you don't want this to tear. Once it is flat, hot glue the die cut round piece to the center on both the front and back. (step 5).
Please comment on my GIVEAWAY post here and become a Follower for a chance to win some vintage ephemera. {Giveaway is now closed}
This is linked to:
All Thingz Related, Between Naps on the Porch, Blue Cricket Designs, Chic on a Shoestring, Craft Envy, DIY Home Sweet Home Project, FaveCrafts, Finding Fabulous, House of Grace, I {heart} Naptime, Keeping It Simple, Krafty Kat, Lovely Crafty Home, Making the World Cuter, My Backyard Eden, My Romantic Home, My Uncommon Slice of Suburbia, Paisley Passions, Passionately Artistic, Simply Designing, Skip to My Lou, Someday Crafts, Somewhat Simple, Tales From Bloggeritaville, The Girl Creative, The Shabby Chic Cottage, The Shabby Nest, The Thrifty Home, The Trendy Treehouse, Under the Table and Dreaming, Very Merry Vintage Style,What's Allie Making Now, Wildflowers and Whimsy and Young Nesters
This has been featured on:


I gathered up lots of scraps of various shades of green paper and die cut them using the Sizzix, Paper Rosettes die. I also die cut several Scallop Circles #2 to add some variation.
I created larger rosettes by doubling-up the Rosette strips (see tutorial below). I printed out the sayings on my computer and used a circle punch. I glued everything together and wanted to find a unique way to display them for St. Patrick's Day.
I recently thrifted some silver sugar bowls and had several mis-matched lids. I used 26 gauge, silver wire (24 gauge might have been better for more stability) and wrapped it around the knobs on the tops of the silver lids. Next I worked the wire until I had a nice, wide arc and used some pliers to create a hook on the end.
I punched a tiny hole in the rosette and balanced them on the hook above the silver lids.
Now all I have to do is wait for St. Patrick's Day.
HOW TO MAKE EXTRA-LARGE PAPER ROSETTES:
To create the larger Rosettes you will need to die cut two pieces (step 1). Glue them together leaving about 1/4" overlapping (step 2). Accordion fold in the same way as a regular-size Paper Rosette (step 3). Glue the ends together to create a tube (step 4). Following the instructions for a regular-size Paper Rosette, gather the ends and gently press down to fan out the sides. You will need to do this part very gently because the outer edges are being stretched and you don't want this to tear. Once it is flat, hot glue the die cut round piece to the center on both the front and back. (step 5).
I attached several Rosettes to a piece of ribbon and created a banner.
This is linked to:
All Thingz Related, Between Naps on the Porch, Blue Cricket Designs, Chic on a Shoestring, Craft Envy, DIY Home Sweet Home Project, FaveCrafts, Finding Fabulous, House of Grace, I {heart} Naptime, Keeping It Simple, Krafty Kat, Lovely Crafty Home, Making the World Cuter, My Backyard Eden, My Romantic Home, My Uncommon Slice of Suburbia, Paisley Passions, Passionately Artistic, Simply Designing, Skip to My Lou, Someday Crafts, Somewhat Simple, Tales From Bloggeritaville, The Girl Creative, The Shabby Chic Cottage, The Shabby Nest, The Thrifty Home, The Trendy Treehouse, Under the Table and Dreaming, Very Merry Vintage Style,What's Allie Making Now, Wildflowers and Whimsy and Young Nesters
This has been featured on:
Saturday, February 26, 2011
Pyrex and Linens Estate Sales
We were able to get to quite a few estate sales today. The hunt is just so exciting.
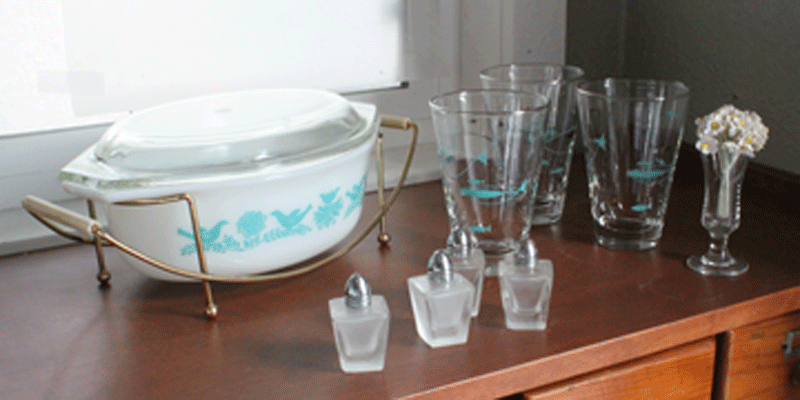
My favorite find were these vintage, turquoise and silver, Libby, Atomic Fish pattern glasses and Pyrex Bluebird pattern casserole with cradle (1959-1961). I also found four little glass, salt and pepper shakers and a small glass vase.
We also found two silver, "quadruple"-plated pieces by the St. Louis Silver Co. The company, best known for making beer steins, went out of business in 1912 so they have to be from the late 1800s to the early 1900s. I think their shapes are so elegant.
My favorite find were these vintage, turquoise and silver, Libby, Atomic Fish pattern glasses and Pyrex Bluebird pattern casserole with cradle (1959-1961). I also found four little glass, salt and pepper shakers and a small glass vase.
To continue with my habit of finding vintage board games, I found this 1967 edition of Go To the Head of the Class. My favorite character piece is a kid named "Cowboy Joe". In 1967, "Mommy" wore pearls and "brother" wore a turtleneck under his cardigan. The illustrations are classic 60s.
I found a box of lace. Some of the lace is handmade which amazes me with the patience required to make this. There was also some lace collars which I'm not sure what I want to do with them but they are so beautiful.
There was also a stack of unused, white, cotton tea towels. The quality of these towels is so nice compared to modern tea towels. I can use these for crafting projects.
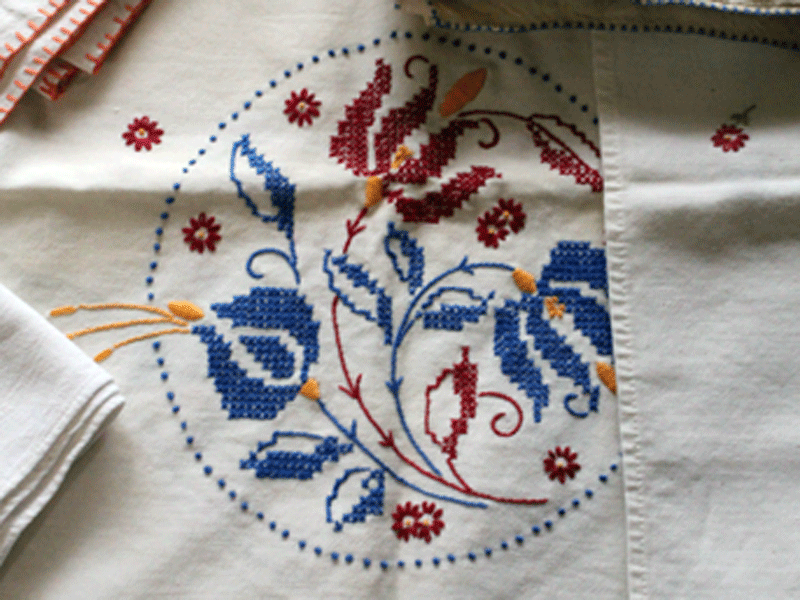
There were also several embroidered towels. My favorite one has a cat in an apron sweeping but it is embroidered in white on a white towel so it is hard to see. There are also two floral baskets, a bird with tea pot and a red and blue design towel. Plus there was a small, pure silk table cloth with embroidered Thai temple images.
The linens would look a lot better if they were ironed but I am always so excited to post as soon as possible.
It was a good day hunting for treasures. We had such a great time but I think I need to open an etsy shop soon or I'll be featured on Hoarders.
This is linked to:
Sunday, February 20, 2011
Handmade, Die Cut Flowers
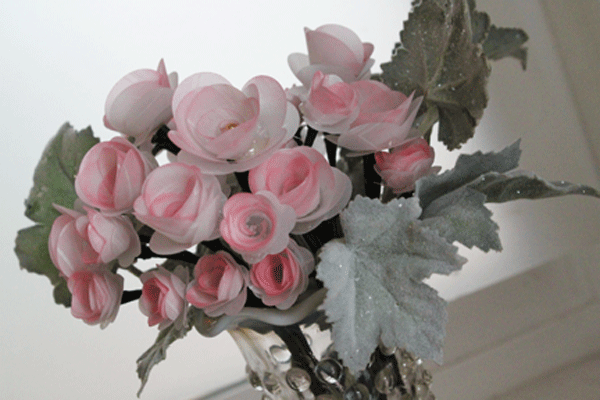
This was one of those projects where I had a vision in my mind of how it would look when completed but it took a little more time than I expected. This is a birthday gift for a friend. Each flower is die cut from vellum using the Sizzix, Flowers, 3D die.
Each die cut flower was lightly inked along the outer edges with Worn Lipstick, Distress Ink. I assembled the flowers following these instructions and used hot glue to hold them together.
Next, I cut 2-inch pieces of 26 gauge floral wire for each of the smaller flowers. I wrapped the wire with floral tape leaving about an inch of extra tape at one end and about a quarter of an inch of wire unwrapped.
I poked a small hole in the bottom of the flower and placed a small dot of hot glue over the hole.
This next part was a little tricky. I then quickly inserted the wire into the hole just enough to hold it when the glue dried but not so deep as to show in the center of the flower. After the glue was dry I finished wrapping the tape around the base of the flower. I placed a small dab of white glue to hold the tape closed.
Next, I wrapped floral tape around 18 gauge floral wire to use as the main stem. About four inches from the end of the wire, I stopped wrapping and added the base of the smaller flower stem and wrapped them tightly to hold in place.
Once the base was secure I bent the small flower stem aside and continued wrapping the main stem leaving about an inch of wire unwrapped.
I attached the larger flowers a little differently. I used a large, decorative pin and pushed it into the center of the flower and out of the back to act as a small stem.
I then wrapped the pin to the 18 gauge wire to securely hold it in place.
After all of the flowers were completed, I arranged them in the vintage, Moonstone Hobnail vase I thrifted at this estate sale and added silk leaves that I thrifted from this sale.
The finished project looks exactly how I envisioned it at the beginning. The only thing I didn't envision was how sticky my fingers would be after handling hot glue, white glue and floral tape.
Honored to be Featured at:
Linking to:
504 Main, All Thingz Related, Between Naps on the Porch, Blue Cricket Design, Brambleberry Cottage, Chic on a Shoestring, Coastal Charm, Crafts Keep Me Sane, DIY Home Sweet Home Project, FaveCrafts, Finding Fabulous, Frugalicious Me, I'm Topsy Turvy, Krafty Kat, Lovely Crafty Home, Making the World Cuter, Marvelously Messy, My Romantic Home, My Uncommon Slice of Suburbia, Paisley Passions, Passionately Artistic, Sunburnt Cow, The Shabby Chic Cottage, The Shabby Nest, Simply Designing, Someday Crafts, Somewhat Simple, These Creative Juices, The Thrifty Home, The Trendy Treehouse, The Girl Creative and What Allie's Making Now.
Each die cut flower was lightly inked along the outer edges with Worn Lipstick, Distress Ink. I assembled the flowers following these instructions and used hot glue to hold them together.
Next, I cut 2-inch pieces of 26 gauge floral wire for each of the smaller flowers. I wrapped the wire with floral tape leaving about an inch of extra tape at one end and about a quarter of an inch of wire unwrapped.
I poked a small hole in the bottom of the flower and placed a small dot of hot glue over the hole.
This next part was a little tricky. I then quickly inserted the wire into the hole just enough to hold it when the glue dried but not so deep as to show in the center of the flower. After the glue was dry I finished wrapping the tape around the base of the flower. I placed a small dab of white glue to hold the tape closed.
Next, I wrapped floral tape around 18 gauge floral wire to use as the main stem. About four inches from the end of the wire, I stopped wrapping and added the base of the smaller flower stem and wrapped them tightly to hold in place.
Once the base was secure I bent the small flower stem aside and continued wrapping the main stem leaving about an inch of wire unwrapped.
I attached the larger flowers a little differently. I used a large, decorative pin and pushed it into the center of the flower and out of the back to act as a small stem.
After all of the flowers were completed, I arranged them in the vintage, Moonstone Hobnail vase I thrifted at this estate sale and added silk leaves that I thrifted from this sale.
The finished project looks exactly how I envisioned it at the beginning. The only thing I didn't envision was how sticky my fingers would be after handling hot glue, white glue and floral tape.
Honored to be Featured at:
Linking to:
504 Main, All Thingz Related, Between Naps on the Porch, Blue Cricket Design, Brambleberry Cottage, Chic on a Shoestring, Coastal Charm, Crafts Keep Me Sane, DIY Home Sweet Home Project, FaveCrafts, Finding Fabulous, Frugalicious Me, I'm Topsy Turvy, Krafty Kat, Lovely Crafty Home, Making the World Cuter, Marvelously Messy, My Romantic Home, My Uncommon Slice of Suburbia, Paisley Passions, Passionately Artistic, Sunburnt Cow, The Shabby Chic Cottage, The Shabby Nest, Simply Designing, Someday Crafts, Somewhat Simple, These Creative Juices, The Thrifty Home, The Trendy Treehouse, The Girl Creative and What Allie's Making Now.
Subscribe to:
Posts (Atom)