Showing posts with label Tutorial. Show all posts

Sunday, March 6, 2011

Vintage Spool Placecard Holder

This placecard holder is part of a larger project that I am working on. Here is a tutorial on how I created this easy project.


Supplies I used:
Wooden Spool (vintage or new)
Lace (length varies depending on the size of the spool but approximately one yard should work)
Alligator clips (mini, 1 1/4" Test Clips, available at Radio Shack)
Chopstick (pointy kind. A small stick might work as long as the end is thin enough)
Saw (or some way to trim the chopstick to length)
Various embellishments


Begin by inserting the chopstick through the spool. Keeping the point flush with one end, mark the length so that the piece will be the same length as the spool once it is trimmed. Using the saw, carefully trim the chopstick.

Next, attach the Alligator clip to the narrow end of the trimmed chopstick. I used needle-nose pliers and pinched the clip to the chopstick. I also used a bit of hot glue to tightly secure the two.

Insert the alligator clip/chopstick piece into the spool and carefully add a spot of hot glue into the top hole to center the clip and some glue into the bottom hole to secure the piece. Be careful not to let the hot glue overflow on the bottom of the spool or it will not sit flat.


Now comes the fun part. Start wrapping the lace (or other embellishment) from the bottom upwards. I used a bit of handmade lace that I found at an estate sale but you can also use ribbon. Note: If you cut handmade lace be sure to add a tiny bit of glue (I used Glossy Accents) to both of the cut ends so that they do not unravel. When you reach the top of the spool, add a spot of glue and secure the end.


To embellish my final piece I inserted a pearl-headed pin and some millinery flowers. The little card on top is from a card game I had thrifted. I liked how it mentions "a second-hand store". It is held in place by the alligator clip. There are so many ways to embellish these. I plan to share more when I complete the bigger project.

Don't forget to comment on my GIVEAWAY post here and become a Follower for a chance to win some vintage ephemera. {Giveaway is now closed}

I'm honored to have been Featured at:
Photobucket  I've Been Featured Button


Linked to:
A Little Knick KnackAll Thingz RelatedBetween Naps on the Porch, Blue Cricket Designs, Brambleberry Cottage, Chic on a ShoestringCoastal Charm, Common GroundDIY Home Sweet Home Project, Finding FabulousHouse of Grace, Just a GirlKeeping it Simple, Krafty Kat, Lovely Crafty HomeMaking the World Cuter, My Backyard Eden, My Romantic HomeMy Uncommon Slice of Suburbia, Paisley Passions, Passionately ArtisticRook No. 17Sarahndipities, Skip to my Lou, Someday Crafts, Somewhat SimpleTales From Bloggeritaville, The Shabby Chic Cottage, The Shabby NestThe Thrifty HomeThe Trendy TreehouseUnder the Table and Dreaming, What Allie's Making Now and Very Merry Vintage Style

Sunday, February 20, 2011

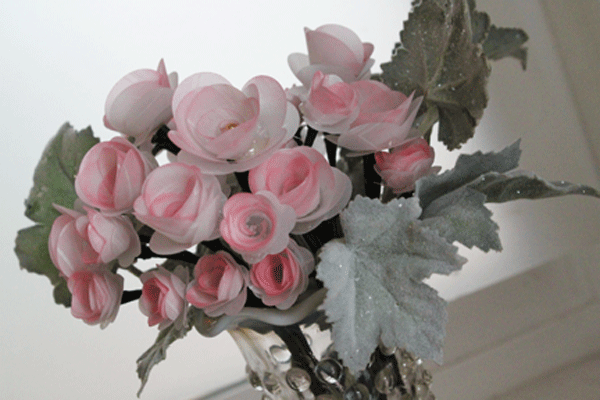
Handmade, Die Cut Flowers

This was one of those projects where I had a vision in my mind of how it would look when completed but it took a little more time than I expected. This is a birthday gift for a friend. Each flower is die cut from vellum using the Sizzix, Flowers, 3D die.

Each die cut flower was lightly inked along the outer edges with Worn Lipstick, Distress Ink. I assembled the flowers following these instructions and used hot glue to hold them together.

Next, I cut 2-inch pieces of 26 gauge floral wire for each of the smaller flowers. I wrapped the wire with floral tape leaving about an inch of extra tape at one end and about a quarter of an inch of wire unwrapped.

I poked a small hole in the bottom of the flower and placed a small dot of hot glue over the hole.

This next part was a little tricky. I then quickly inserted the wire into the hole just enough to hold it when the glue dried but not so deep as to show in the center of the flower. After the glue was dry I finished wrapping the tape around the base of the flower. I placed a small dab of white glue to hold the tape closed.

Next, I wrapped floral tape around 18 gauge floral wire to use as the main stem. About four inches from the end of the wire, I stopped wrapping and added the base of the smaller flower stem and wrapped them tightly to hold in place.

Once the base was secure I bent the small flower stem aside and continued wrapping the main stem leaving about an inch of wire unwrapped.

I attached the larger flowers a little differently. I used a large, decorative pin and pushed it into the center of the flower and out of the back to act as a small stem.

I then wrapped the pin to the 18 gauge wire to securely hold it in place.


After all of the flowers were completed, I arranged them in the vintage, Moonstone Hobnail vase I thrifted at this estate sale and added silk leaves that I thrifted from this sale.

The finished project looks exactly how I envisioned it at the beginning. The only thing I didn't envision was how sticky my fingers would be after handling hot glue, white glue and floral tape.

Honored to be Featured at:


Linking to:
504 MainAll Thingz RelatedBetween Naps on the Porch, Blue Cricket Design, Brambleberry Cottage, Chic on a ShoestringCoastal CharmCrafts Keep Me SaneDIY Home Sweet Home Project, FaveCraftsFinding Fabulous, Frugalicious Me,  I'm Topsy TurvyKrafty Kat, Lovely Crafty HomeMaking the World Cuter, Marvelously Messy, My Romantic HomeMy Uncommon Slice of Suburbia, Paisley Passions, Passionately Artistic, Sunburnt Cow The Shabby Chic Cottage, The Shabby Nest, Simply DesigningSomeday Crafts, Somewhat SimpleThese Creative Juices, The Thrifty Home, The Trendy TreehouseThe Girl Creative and What Allie's Making Now.
Related Posts Plugin for WordPress, Blogger...