I have been fascinated with Putz Houses ever since I found my first vintage ones here. Somewhere, in the stack of crafting to-do ideas, was the desire to create my own unique Putz Houses.
I finally decided to design a Putz Cabin as a gift.
I started with a base cut from the plastic packaging of a Sizzix Alterations stamp and die set. It was sturdy yet light. I cut the house frame from thick cardstock.
Showing posts with label Christmas. Show all posts
Showing posts with label Christmas. Show all posts
Sunday, December 21, 2014
Tuesday, December 24, 2013
Down to the Wire for a Merry Christmas!
I haven't posted for a while but I have some great excuses plus I have accomplished a lot during this time. One excuse is that CHA {Craft and Hobby Association} trade show is coming up and work has been extremely busy. Another excuse is that I have been doing a lot of freelance which makes me happy. And my third excuse is that I have been busy crafting which left very little time for posting.
So now I can share everything that I've crafted during the month of December.
My favorite decoration this year was so fast, easy and cheap. I used one large and one small vintage, thrifted, drum-style fish bowl filled with recyclable packing peanuts to create a totally California Snowman.
I used thrifted buttons for the eyes and mouth. And because this is a California Snowman, I used a thrifted seashell for the nose.
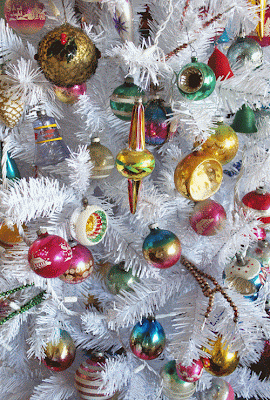
I already shared my tree here but I just love how cheerful all of the vintage ornaments look.
I pulled out all of my vintage Santas and Holiday Thermoses to decorate a shelf.
Every year my sister and I exchange handmade Christmas ornaments. We use a theme based on the Wedding Anniversary gift guide. This year the Traditional gift suggestion is Cotton and the Modern gift is China. So I used cotton yarn and crocheted a "China teacup". I found the pattern at TurtleDoveCoo.
You can see the Paper/Clock ornament I made for her last year.
As a gift for my coworkers, I made a batch of crocheted snowmen.
I found the pattern at The Dapper Toad. I sat and crocheted these in my truck during my lunch hour and a few were made while sitting in the Target parking lot waiting for the rain to stop. Everyone loved these little guys.
Finally, I made a burlap wreath with vintage Christmas ornaments for my wonderful neighbor.
AND, in between all of this, my son had a track day to test out his race car. Car was great but my dog was a little bored.
No time to be sitting around now! Last minute details to take care of today. I wish everyone a Christmas filled with hope, joy and peace.
Friday, November 8, 2013
Vintage Jewelry Christmas Tree in 3-D
I love a creative challenge so what could be more fun than a Christmas themed Challenge using Dew Drops from The Robin's Nest and a Smoothfoam Cone!
The idea for a 3-D version of a vintage jewelry Christmas tree came from one of those vintage framed jewelry Christmas trees that I found at an estate sale. The jewelry was interesting but the shape of the tree just wasn't pleasing so I decided to disassemble the pieces and make my own modern version of this classic kitschy tree.
I began with a 9" Smoothfoam cone and added a stainless steel scrubber that I loosely pulled over the cone shape. It didn't cover it completely but the idea was to create a filler so that later, the styrofoam would not be seen between the jewelry pieces.
Then came the fun part of sorting and selecting the vintage jewelry. I chose only silver tone, white or pearl jewelry, avoiding colored stones and most gold tone metals {I had to keep the crowns seen below}. I used hot glue and began at the bottom with the largest pieces of jewelry.
If you check out the original framed jewelry tree you will see this dog and the crown as they originally appeared.
You can see how the stainless steel scrubber works as a filler.
Because I didn't use any colored jewelry on this tree, the shiny red Dew Drops from The Robin's Nest add just the right amount of accent color throughout the tree.
I only used the red Dew Drops which really adds such a nice pop of color.
This is linked to:
30 Handmade Days, 504 Main, Cherished Handmade Treasures, Craft-o-Maniac, Gingersnap Crafts, JAQS Studio, Just Us Four, Kammy's Korner, Kathe With an E, Knick of Time Interiors, Ladybug Blessings, Mad in Crafts, Not Just a Housewife, Our Delightful Home, Sew Can Do, Sew Much Ado, Simply Designing, Sugar Bee Crafts, Tatertots and Jello and The DIY Dreamer
Saturday, December 22, 2012
Christmas Sneaks Up on Me Every Year
I know that Christmas comes at the same time every year and you would think one could plan and prepare months in advance. I suppose there are many people who are well prepared for the holidays... I am just not one of them. But in my defense this is the busiest time of the year for my work {I just went to a press check yesterday for Tim Holtz's catalog} and this particular year I received some rush freelance projects that have taken up all of my free time.
Between freelancing and holiday preparations I finally found some time to go to one estate sale. It was the second day of the sale but I did find a few nice crafting supplies and a nice vintage Christmas treasure.
My favorite find is this vintage cardboard Santa once given as a promotional item by Richfield gas stations probably back in the 60s. This paper ornament has survived in great condition.
Another fun find was a jar filled with vintage bells. They definitely have a nicer sound than modern bells.
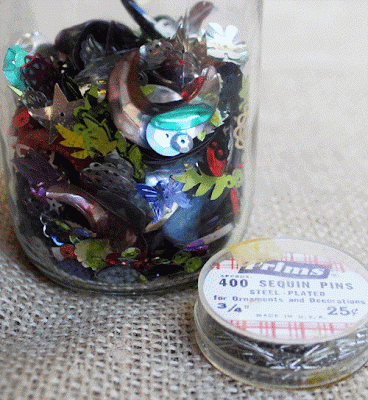
I also bought a jar of sequins. I wasn't sure of what I would do with them except that I've seen many lovely ones used on an old bottlebrush trees. I also found a container of sequin pins. I didn't even know that there were special pins that are used with sequins.
These are two pairs of old paper foil wings. I think they would look great used in a collage.
The final item I found was a box of old, metal sewing bobbins. I like metal bobbins better than the modern plastic version.
It wasn't a very large find but it was definitely a very colorful selection. Now I must get back to working on my freelancing and wrapping some presents.
Hope everyone had a wonderful day of treasure hunting.
Monday, December 3, 2012
Designers Craft Connection Blog Hop - December
Welcome to the Designers Craft Connection Blog Hop for the month of December. This month's theme is "Handmade for the Holidays".
I am excited about this month's theme because; 1) I love making things, 2) I love the holidays and 3) I had a perfect idea for a dual-purpose project.
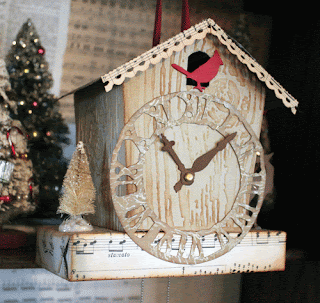
My sister and I exchange handmade ornaments every year. This year our theme was "Something Made of Paper". So combining the themes I created a "Tim Holtz Cuckoo Clock" ornament.
I hope you enjoyed my Handmade for the Holidays project. Please use the DCC Blog Hop button on the right to visit all of the talented designers and see their creative projects.
This is linked to:
Beyond the Picket Fence, Coastal Charm, Elizabeth and Co., Making the World Cuter, My Uncommon Slice of Suburbia, Savvy Southern Style, Sew Can Do, Sew Much Ado, Someday Crafts, Sugar Bee Crafts, The Shabby Creek Cottage, The Thrifty Home, The Trendy Treehouse, Topsy Turvy and Twin Dragonfly Designs
I am excited about this month's theme because; 1) I love making things, 2) I love the holidays and 3) I had a perfect idea for a dual-purpose project.
My sister and I exchange handmade ornaments every year. This year our theme was "Something Made of Paper". So combining the themes I created a "Tim Holtz Cuckoo Clock" ornament.
I began by covering a small box with old sheet music. This happened to be from The Nutcracker Suite in case anyone happens to notice. Before I sealed up the box I punched two small holes in the bottom of the box and ran a small chain through it leaving both ends hanging out of the bottom. I sealed up the box and used Distress inks to age the paper edges.
Using all Sizzix dies, I die cut two Tattered Pinecone pieces and followed Tim Holtz's video to create the pinecones hanging beneath the clock. I added some snowy glitter using white glue.
I cut out a House, 3-D and used the Woodgrain Texture Fade for added dimension to the sides. Again, using Distress inks I highlighted the raised texture. I cut an opening near the top arch and attached a small die cut Cardinal {more festive than a Cuckoo Bird}.
I die cut the Weathered Clock and first applied Tea Dye Distress ink as a background color. Next, I used Perfect Medium with an all-over pattern stamp and applied Perfect Pearls in Heirloom Gold. This created a random, worn metallic look to the clock face. Before assembling the clock/house I laid the clock face on the front and determined where the clock hands would be attached. I used a small brad to attach the hands then removed the clock face while I worked on the next steps.
I assembled the clock/house and decided that it needed a roof. I folded a piece of brown cardstock and ran both sides through my Vagabond die cutting machine using the Snowflurries Texture Fade. I sanded the raised surface to give it more texture. I also added a small piece of die cut Vintage Lace along the front edge of the roof. It is cut from more old sheet music and left over from a previous project. It gave the house a gingerbread roof line. I used a large needle to punch two holes in the roof and top of the house. I glued the roof to the house then strung a piece of vintage ribbon through the holes.
I used hot glue to attach the house to the bottom box. I glued the clock face to both the house and the base. On the left side of the clock I added a small bottlebrush tree. On the right, I glued a small die cut Reindeer.I hope you enjoyed my Handmade for the Holidays project. Please use the DCC Blog Hop button on the right to visit all of the talented designers and see their creative projects.
This is linked to:
Beyond the Picket Fence, Coastal Charm, Elizabeth and Co., Making the World Cuter, My Uncommon Slice of Suburbia, Savvy Southern Style, Sew Can Do, Sew Much Ado, Someday Crafts, Sugar Bee Crafts, The Shabby Creek Cottage, The Thrifty Home, The Trendy Treehouse, Topsy Turvy and Twin Dragonfly Designs
Tuesday, December 20, 2011
Christmas Decorating With a New Puppy
I love decorating for Christmas. I have been collecting ornaments since the early 1970s. This year we have a new puppy that is a little too curious for her own good. So this year I am not putting up a full Christmas tree and exposing my ornament collection to the whims of a very nosy pup.
This year we are decorating in miniature and high off of the ground.
I placed my silver tree with all of my small Shiny Brite ornaments on top of my display cabinet.
In the cabinet I placed my other vintage Christmas items as well as some dolls and silver. Everything is thrifted except for the Midge doll.
I had to find a way to display my larger Shiny Brite ornaments so they are nestled in a tiered basket along with my large vintage bottlebrush wreath.
So far the puppy hasn't been able to reach anything. The house isn't quite as festive but at least everyone and everything is safe.
This is linked to:
Beyond the Picket Fence, Blue Cricket Design, Brambleberry Cottage, Coastal Charm, Creating a House of Grace, Life Made Lovely, Mod Vintage Life, My Uncommon Slice of Suburbia, Rook No. 17, Savvy Southern Style, The 36th Avenue, The Colorado Lady, The Shabby Creek Cottage, The Southern Institute, Thrifty Decorating, Type A and Very Merry Vintage Style
This year we are decorating in miniature and high off of the ground.
I placed my silver tree with all of my small Shiny Brite ornaments on top of my display cabinet.
In the cabinet I placed my other vintage Christmas items as well as some dolls and silver. Everything is thrifted except for the Midge doll.
I had to find a way to display my larger Shiny Brite ornaments so they are nestled in a tiered basket along with my large vintage bottlebrush wreath.
My final bit of decorating is my stack of vintage doll suitcases. I tied them up with large red ribbon to look like presents.
So far the puppy hasn't been able to reach anything. The house isn't quite as festive but at least everyone and everything is safe.
This is linked to:
Beyond the Picket Fence, Blue Cricket Design, Brambleberry Cottage, Coastal Charm, Creating a House of Grace, Life Made Lovely, Mod Vintage Life, My Uncommon Slice of Suburbia, Rook No. 17, Savvy Southern Style, The 36th Avenue, The Colorado Lady, The Shabby Creek Cottage, The Southern Institute, Thrifty Decorating, Type A and Very Merry Vintage Style
Monday, December 19, 2011
Christmas Pocket Card
I finally completed my annual Christmas card for Dear Handyman's sister in England. Yes, I know it is terribly late. Inspiration doesn't always obey the calendar.
Every year I like to send Brenda a mini-scrapbook Christmas card. She doesn't often get photographs of her family here so I like to send a card that is filled with photos. I'm not going to show the photo tags but you can imagine all of these pockets having photos and stories. I created this using the Sizzix Pocket Page & Tag die that I designed.
This is the front page. I used the Basic Grey Curio line of papers. I wanted a two-sided paper that was in a non-traditional red and green color palette. On this cover I used vintage lace that I tea-dyed, a vintage Bingo number and vintage holly leaves. The Christmas quote was from an old Christmas card that I scanned. I stamped the words "Merry Christmas" on a die cut Tattered Banner.
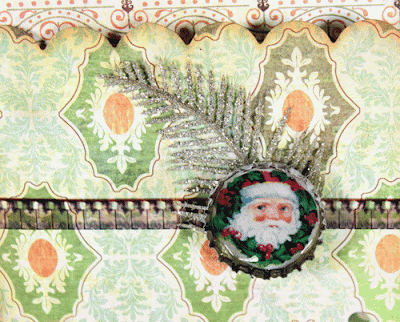
I kept this next page very simple. I first glued a piece of vintage 8mm film around the page. Next I scanned and printed an old Christmas sticker of Santa Claus that I thrifted here. I trimmed it and glued it inside a bottlecap. I then filled it with a layer of Glossy Accents to add shine. Here is a detailed image below. You can download the Santa image at the end of this post.
This is the other side of the page above. You can see the film strip here as well. I sewed some vintage buttons to a ticket.
This next page was to announce the engagement of her nephew. I used some small white silk flowers and tied them to the word key. I glued on a clear heart button on top {hard to see} and then glued everything to the ticket.
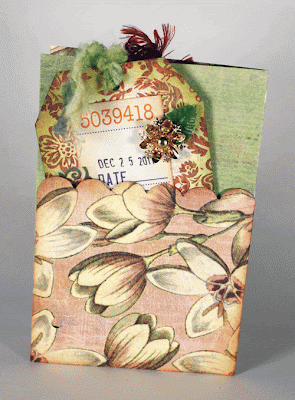
On the tag below, I used a vintage earring as the embellishment. I cut the back off of a piece of costume jewelry and glued it to the tag. Because the tag was decorated, I kept the pocket page very simple.
The last page has a rubber stamp of Santa because I love this Retro Santa stamp by Tim Holtz.
I know this won't get to England before Christmas but it is the thought that counts and there is a lot of warm thoughts in this card.
Here is the vintage Santa sticker that I used inside the bottlecap. Feel free to download this as long as it is for non-commercial use. Merry Christmas!
This is linked to:
Saturday, January 8, 2011
First 2011 Estate Sale
We discovered a resale estate sale. I thought the new year would start off slowly but I found some really nice treasures.
There is nothing like a lime green aluminum pitcher to immediately attract your attention. I have seen aluminum cups in bright colors but I've never seen a pitcher. The photo does not convey the true green color. This is a Norben Ware pitcher which I hope does not get me started collecting matching cups.
This is an interesting 1962 atlas that states "Space Age World Atlas" and "Earth... as seen by the astronauts". I loved the image of the astronaut in the bright neon colors of the 60s. The "Space Age" began approximately five years before this atlas was printed. In 1962 only about 22 United States astronauts had ever been in space and it wasn't until seven years later that man first walked on the Moon. Space exploration was very new and exciting when this atlas was printed.
I was attracted to these copper/brass measuring cups because of their color and their heavy weight. They seemed old because newer copper measuring cups wouldn't weigh as much as this set. The copper finished just looked pretty. I seem to be starting a collection of measuring cups since this is an addition to my previous treasure find.
This Federal Star glass juice pitcher looked so cute with its petite size and the star on the bottom.
I found quite a few of these Swedish tartlet molds. I liked their shape and saw a lot of crafting potential in them. I plan to use the heart-shaped molds for some Valentine projects. Click here to see some finished projects using the Heart Tartlet pans.
One can always find a use for red floral picks. These will be set aside for future Christmas projects.
And then there were the old Christmas ornaments. Oh how I love old ornaments! These first two have a unique round shape protruding at the bottom. The pink ornament also has three indented shapes around it.
Sorry, I forgot to reveal the best part that made this such a fun and thrifty treasure hunt. Everything was at half-price so I got all of this for about $25 which also included sales tax.
2011 has started off with some very good thrifty treasure hunting.
This is linked to Vintage Thingie Thursday, Coastal Charm and Apron Thrift Girl.
There is nothing like a lime green aluminum pitcher to immediately attract your attention. I have seen aluminum cups in bright colors but I've never seen a pitcher. The photo does not convey the true green color. This is a Norben Ware pitcher which I hope does not get me started collecting matching cups.
This is an interesting 1962 atlas that states "Space Age World Atlas" and "Earth... as seen by the astronauts". I loved the image of the astronaut in the bright neon colors of the 60s. The "Space Age" began approximately five years before this atlas was printed. In 1962 only about 22 United States astronauts had ever been in space and it wasn't until seven years later that man first walked on the Moon. Space exploration was very new and exciting when this atlas was printed.
I was attracted to these copper/brass measuring cups because of their color and their heavy weight. They seemed old because newer copper measuring cups wouldn't weigh as much as this set. The copper finished just looked pretty. I seem to be starting a collection of measuring cups since this is an addition to my previous treasure find.
This Federal Star glass juice pitcher looked so cute with its petite size and the star on the bottom.
I found quite a few of these Swedish tartlet molds. I liked their shape and saw a lot of crafting potential in them. I plan to use the heart-shaped molds for some Valentine projects. Click here to see some finished projects using the Heart Tartlet pans.
One can always find a use for red floral picks. These will be set aside for future Christmas projects.
And then there were the old Christmas ornaments. Oh how I love old ornaments! These first two have a unique round shape protruding at the bottom. The pink ornament also has three indented shapes around it.
These gold deer ornaments have a concave side with a plastic deer and snow set inside. The ornament is marked "Japan".
The gold ornament below is a teardrop shape and is marked "Poland".
This last photo is of tiny Shiny Brite ornaments. These are perfect for my vintage plastic Christmas tree.Sorry, I forgot to reveal the best part that made this such a fun and thrifty treasure hunt. Everything was at half-price so I got all of this for about $25 which also included sales tax.
2011 has started off with some very good thrifty treasure hunting.
This is linked to Vintage Thingie Thursday, Coastal Charm and Apron Thrift Girl.
Subscribe to:
Posts (Atom)


