This is the fourth year that my sister and I are exchanging handmade themed ornaments. Here are some of the past ornaments that I have made. Book, Paper Clock and Cotton China. Beginning from the Paper Clock, we started the themes based on the wedding anniversary gift suggestion. The first year being either Paper {traditional gift} or Clock {modern}. I like to create the ornaments using both themes.
This is the third year {again, not counting the first Book ornament} so the anniversary gift suggestion is Leather {traditional} or Crystal {modern}. We also added a twist this year because we both bought old player piano rolls while thrifting in Las Vegas recently so we agreed to add the piano roll paper to this year's ornament.
I made a Dream Catcher ornament.
Showing posts with label Ornament. Show all posts
Showing posts with label Ornament. Show all posts
Monday, December 22, 2014
Tuesday, December 24, 2013
Down to the Wire for a Merry Christmas!
I haven't posted for a while but I have some great excuses plus I have accomplished a lot during this time. One excuse is that CHA {Craft and Hobby Association} trade show is coming up and work has been extremely busy. Another excuse is that I have been doing a lot of freelance which makes me happy. And my third excuse is that I have been busy crafting which left very little time for posting.
So now I can share everything that I've crafted during the month of December.
My favorite decoration this year was so fast, easy and cheap. I used one large and one small vintage, thrifted, drum-style fish bowl filled with recyclable packing peanuts to create a totally California Snowman.
I used thrifted buttons for the eyes and mouth. And because this is a California Snowman, I used a thrifted seashell for the nose.
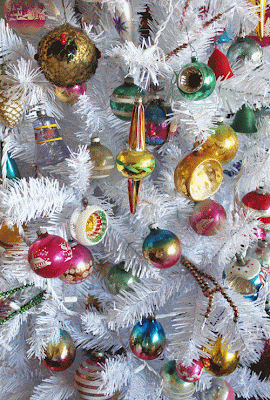
I already shared my tree here but I just love how cheerful all of the vintage ornaments look.
I pulled out all of my vintage Santas and Holiday Thermoses to decorate a shelf.
Every year my sister and I exchange handmade Christmas ornaments. We use a theme based on the Wedding Anniversary gift guide. This year the Traditional gift suggestion is Cotton and the Modern gift is China. So I used cotton yarn and crocheted a "China teacup". I found the pattern at TurtleDoveCoo.
You can see the Paper/Clock ornament I made for her last year.
As a gift for my coworkers, I made a batch of crocheted snowmen.
I found the pattern at The Dapper Toad. I sat and crocheted these in my truck during my lunch hour and a few were made while sitting in the Target parking lot waiting for the rain to stop. Everyone loved these little guys.
Finally, I made a burlap wreath with vintage Christmas ornaments for my wonderful neighbor.
AND, in between all of this, my son had a track day to test out his race car. Car was great but my dog was a little bored.
No time to be sitting around now! Last minute details to take care of today. I wish everyone a Christmas filled with hope, joy and peace.
Monday, December 3, 2012
Designers Craft Connection Blog Hop - December
Welcome to the Designers Craft Connection Blog Hop for the month of December. This month's theme is "Handmade for the Holidays".
I am excited about this month's theme because; 1) I love making things, 2) I love the holidays and 3) I had a perfect idea for a dual-purpose project.
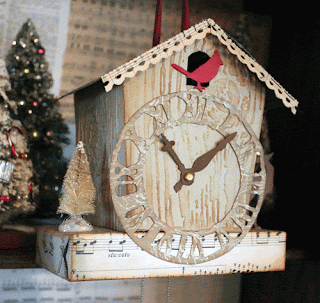
My sister and I exchange handmade ornaments every year. This year our theme was "Something Made of Paper". So combining the themes I created a "Tim Holtz Cuckoo Clock" ornament.
I hope you enjoyed my Handmade for the Holidays project. Please use the DCC Blog Hop button on the right to visit all of the talented designers and see their creative projects.
This is linked to:
Beyond the Picket Fence, Coastal Charm, Elizabeth and Co., Making the World Cuter, My Uncommon Slice of Suburbia, Savvy Southern Style, Sew Can Do, Sew Much Ado, Someday Crafts, Sugar Bee Crafts, The Shabby Creek Cottage, The Thrifty Home, The Trendy Treehouse, Topsy Turvy and Twin Dragonfly Designs
I am excited about this month's theme because; 1) I love making things, 2) I love the holidays and 3) I had a perfect idea for a dual-purpose project.
My sister and I exchange handmade ornaments every year. This year our theme was "Something Made of Paper". So combining the themes I created a "Tim Holtz Cuckoo Clock" ornament.
I began by covering a small box with old sheet music. This happened to be from The Nutcracker Suite in case anyone happens to notice. Before I sealed up the box I punched two small holes in the bottom of the box and ran a small chain through it leaving both ends hanging out of the bottom. I sealed up the box and used Distress inks to age the paper edges.
Using all Sizzix dies, I die cut two Tattered Pinecone pieces and followed Tim Holtz's video to create the pinecones hanging beneath the clock. I added some snowy glitter using white glue.
I cut out a House, 3-D and used the Woodgrain Texture Fade for added dimension to the sides. Again, using Distress inks I highlighted the raised texture. I cut an opening near the top arch and attached a small die cut Cardinal {more festive than a Cuckoo Bird}.
I die cut the Weathered Clock and first applied Tea Dye Distress ink as a background color. Next, I used Perfect Medium with an all-over pattern stamp and applied Perfect Pearls in Heirloom Gold. This created a random, worn metallic look to the clock face. Before assembling the clock/house I laid the clock face on the front and determined where the clock hands would be attached. I used a small brad to attach the hands then removed the clock face while I worked on the next steps.
I assembled the clock/house and decided that it needed a roof. I folded a piece of brown cardstock and ran both sides through my Vagabond die cutting machine using the Snowflurries Texture Fade. I sanded the raised surface to give it more texture. I also added a small piece of die cut Vintage Lace along the front edge of the roof. It is cut from more old sheet music and left over from a previous project. It gave the house a gingerbread roof line. I used a large needle to punch two holes in the roof and top of the house. I glued the roof to the house then strung a piece of vintage ribbon through the holes.
I used hot glue to attach the house to the bottom box. I glued the clock face to both the house and the base. On the left side of the clock I added a small bottlebrush tree. On the right, I glued a small die cut Reindeer.I hope you enjoyed my Handmade for the Holidays project. Please use the DCC Blog Hop button on the right to visit all of the talented designers and see their creative projects.
This is linked to:
Beyond the Picket Fence, Coastal Charm, Elizabeth and Co., Making the World Cuter, My Uncommon Slice of Suburbia, Savvy Southern Style, Sew Can Do, Sew Much Ado, Someday Crafts, Sugar Bee Crafts, The Shabby Creek Cottage, The Thrifty Home, The Trendy Treehouse, Topsy Turvy and Twin Dragonfly Designs
Tuesday, December 20, 2011
Christmas Decorating With a New Puppy
I love decorating for Christmas. I have been collecting ornaments since the early 1970s. This year we have a new puppy that is a little too curious for her own good. So this year I am not putting up a full Christmas tree and exposing my ornament collection to the whims of a very nosy pup.
This year we are decorating in miniature and high off of the ground.
I placed my silver tree with all of my small Shiny Brite ornaments on top of my display cabinet.
In the cabinet I placed my other vintage Christmas items as well as some dolls and silver. Everything is thrifted except for the Midge doll.
I had to find a way to display my larger Shiny Brite ornaments so they are nestled in a tiered basket along with my large vintage bottlebrush wreath.
So far the puppy hasn't been able to reach anything. The house isn't quite as festive but at least everyone and everything is safe.
This is linked to:
Beyond the Picket Fence, Blue Cricket Design, Brambleberry Cottage, Coastal Charm, Creating a House of Grace, Life Made Lovely, Mod Vintage Life, My Uncommon Slice of Suburbia, Rook No. 17, Savvy Southern Style, The 36th Avenue, The Colorado Lady, The Shabby Creek Cottage, The Southern Institute, Thrifty Decorating, Type A and Very Merry Vintage Style
This year we are decorating in miniature and high off of the ground.
I placed my silver tree with all of my small Shiny Brite ornaments on top of my display cabinet.
In the cabinet I placed my other vintage Christmas items as well as some dolls and silver. Everything is thrifted except for the Midge doll.
I had to find a way to display my larger Shiny Brite ornaments so they are nestled in a tiered basket along with my large vintage bottlebrush wreath.
My final bit of decorating is my stack of vintage doll suitcases. I tied them up with large red ribbon to look like presents.
So far the puppy hasn't been able to reach anything. The house isn't quite as festive but at least everyone and everything is safe.
This is linked to:
Beyond the Picket Fence, Blue Cricket Design, Brambleberry Cottage, Coastal Charm, Creating a House of Grace, Life Made Lovely, Mod Vintage Life, My Uncommon Slice of Suburbia, Rook No. 17, Savvy Southern Style, The 36th Avenue, The Colorado Lady, The Shabby Creek Cottage, The Southern Institute, Thrifty Decorating, Type A and Very Merry Vintage Style
Monday, September 27, 2010
Felt Christmas Ornament
I used the Sizzix Pumpkin 3-D die by Karen Burniston and cut 20 felt pieces. I cut off all of the little tabs that are needed to assemble the paper version of this design.
I first sewed all of the pieces together in the center flat side of the shapes and tied it together to create a loose ball shape. I then stitched all of the tops together and then all of the bottoms together to create the ball shape. It needed a bit of fluffing to make the ball look round.
I sewed the ribbon to the top and an acrylic charm to the bottom. I colored the charm with alcohol ink and then stamped a pattern and lifted the ink in that area.
My sister and I exchange homemade Christmas ornaments each year so this is for her.
Subscribe to:
Posts (Atom)


