Showing posts with label Rubber Stamp. Show all posts

Thursday, November 11, 2010

Sizzix Triple Play Blog Hop - Twist Cube, 3-D


Today I Created | Karen Burniston's 3-D Twist Cube using mostly Tim Holtz product.

Welcome to Week 2 of the Sizzix Triple Play Blog Hop. The featured die is the Sizzix Cube, Twist 3-D pop-up Bigz XL die by Karen Burniston. I had a lot of fun with this project so I included a lot of details regarding products used and various techniques.

My design concept was to try and use as many Tim Holtz products from my stash as possible. I started off by doing a lot of sketches and some test cuts to see how everything went together. When I was ready I cut all of my pieces from tan cardstock (the only product I had to purchase) and made little piles of embellishments that I planned to use on each side. Next came the fun part of decorating the sides.

The image above is the top with the cube folded flat. I used the Sizzix Retro Circles Texture Fades to create the pattern in the paper and Distress inks in Spiced Marmalade, Tea Dyed and Barn Door. I applied the inks using the technique in Tim's Compendium of Curiosities (CC) book, page 33. I attached the Button (my stash) by inserting the stem of the button through the cardstock and attaching it with wire hidden inside and then looping a Ball Chain around the button. Other products used: Journaling Ticket and ABC Skid alphabet stickers by Creative Imaginations. The other items you see along the edges are actually parts of the various sides of the cube and will be described later.

On the front of the cube I used the Cracked Texture Fades and applied the same colors of Distress inks plus Dusty Concord using the CC technique on page 40. The die cut shape is the Styled Label stamped with the Crown from the Regal Flourish stamp set using the technique on CC page 37. I also added a Game Spinner.

The left side has two paper images from the Graphics Fairy. The crown paper just worked so perfectly in this design. The stamp in the corner is part of the Regal Flourish set using Black Soot Distress Ink. I also used some Traveler Tissue Tape, Ball Chain and Type Charm. I punched a small hole on the front and side of the cube and hung the Type Charm from the corner.

The back was a little more free-formed. I used the same inking technique on CC page 33 but without the Texture Fade so the ink blended on the paper surface. The Clock is from the Journey stamp set. The Wings (top right corner) are die cut from plastic packaging using the Sizzix Heart Wings die and then embossed with the Patchwork Texture Fade. I inked them with Alcohol inks in Purple Twilight and Sunset Orange.

On the right side I inked all of the edges before assembling so I was able to get crisp edges. The wing is created with the Regal Flourish stamp and Perfect Pearls using the CC technique on page 38. The Crown is die cut from Grunge Paper using the Sizzix Heart Wings die then I applied Rock Candy Distress Crackle Paint and Dusty Concord ink using the technique on CC page 42. It is attached using a Memo Pin. Other product used: Filmstrip Ribbon with a bit of Alcohol ink for color.

The bottom side worked well because I used only three main colors of Distress inks in this project so, although the panels are all very different, they visually work together. I used a French postcard image and a French map image from the Graphics Fairy on two panels. The other panel is a continuation of the side. I added more Traveler Tissue Tape and a stamp from the Journey set.

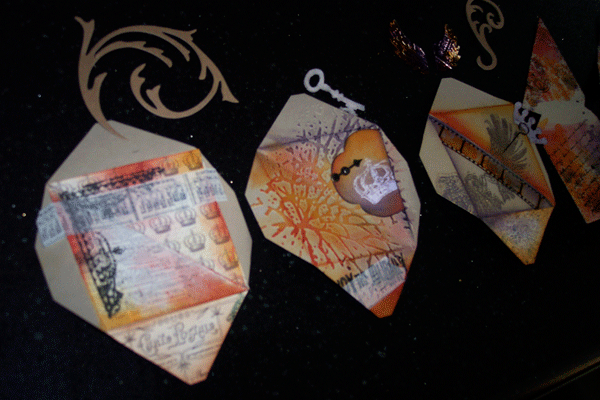
I didn't want to ruin the surprise of the completed cube so I left these last two photos for the end. As I said at the beginning, I did sketches and made samples to see how everything would work together. Before assembing the final cube I laid everything out to see how it would work. Here are the photos prior to assembly. You can see in these photos that I had additional embellishments (Swirls and Key) that I did not use in the final piece.

I hope you enjoy this example of the Twist Cube as much as I enjoyed making it. And thanks to Karen Burniston for designing such a clever die.

Please continue on through the Blog Hop using the Forward or Back links in the Triple Play Blog Hop blinkie. And please be sure to visit again next Thursday when the featured die will be the Flower, Beauty Bloom.

Tuesday, October 26, 2010

Thank You card


Today I Created | A Thank You card

I created this thank you card using the Sizzix Ticket Strip die and the Tattered Floral die. I used the Tim Holtz acrylic stamps for the ticket image and left the center of one ticket empty so that I could add the word "Thanks".

I am also announcing a slight change to the format of my blog. Because I have been attempting to create something everyday, I tended to work towards quantity rather than quality. My day, like most people's, is very busy so I don't always spend as much quality time creating as I would like.

So beginning today I am going to attempt for more quality projects but with a little less frequency. I will still create something everyday but I will now allow myself more time to design and create even if it means that I don't post everyday. My goal is to enjoy creating something everyday.

Monday, October 25, 2010

Bleach Stamping


Today I Created | A Bleached-Stamped T-Shirt

Two things I know about bleach: 1) It can ruin your clothes if you spill it and 2) It is a liquid.

The reason I mention these two points is because I began to wonder if you could "rubber stamp" with bleach, sort of a "reverse rubber stamp" by removing color rather than applying color.

First I die cut the Decorative Accent and Elegant Flourishes shapes out of adhesive craft foam and mounted them to a piece of acrylic. This created the "rubber stamp". I also used the Accent die to cut an extra piece of adhesive-backed t-shirt fabric.

Next I poured bleach onto a paper towel in a shallow dish to use as the "stamping pad".

I had a pre-washed t-shirt with a layer of aluminum foil and paper towels inside so nothing would soak through. I then stamped the bleach onto the flat t-shirt. I found that the color lightens as it dries.

After the bleach dried I used acrylic paint on the same foam stamp and printed on the shirt. I sewed on the extra fabric die cut shape as an accent. Finally I sewed random stitches on top of everything to add some detail.

Things I learned from this: 1) bleach can be a unique and unpredictable art medium and 2) bleach does not affect adhesive craft foam so you can use it for other projects.


Additional Note: I wore this t-shirt as my workplace Halloween costume. I was a "Tim Holtz Grunge Groupie". Please see my post on October 28th to find the unexpected result of my costume choice.

Wednesday, September 29, 2010

Autumn Artistamp

Today I Created | Autumn postage stamps

I had so much fun with the Munk e-mail postage stamps so I decided to try another experiment.

I wanted to use more color but I don't own a lot of ink pads. I do, however, have a variety of Glimmer Mist sprays in some nice Autumn colors. So I experimented with rubber stamping Glimmer Mist inks.

Again, I printed the words using the computer. Next I sprayed Glimmer Mist on my craft mat and inked my rubber stamps right on the mat. This created some unexpected results with blending colors. Green and red create muddy brown very quickly. I had to clean off the mat and respray to keep the colors bright.

After using Glimmer Mists instead of ink pads I would recommend ink pads if you have them but this was a good learning experience.

Sunday, September 26, 2010

Die cut and Stamped Card

Today I Created | A card at a Stampin' Up Demo

I'm not a big card maker. And I'm not a big rubber stamper. But my friend, Danielle has become a Stampin' Up demonstrator so I attended her first event.

There was some cute stuff and I just really enjoy crafting so I had a good time.

So today I created something and visited with friends.

Wednesday, September 22, 2010

Findings Tag

Today I Created | A findings tag.

Because this tag is so clean and simple, I plan to use it on a scrapbooking page. I left enough space to journal on the tag.

I embossed just one corner with a Texture Fade. I used a rubber stamp to add the bit of type on the side. I used Distress Inks to add some color along the edges.

Finally, I added a Trinket Pin to hold a tiny pair of scissors. The metal scissors were from a pair of earrings that broke but I loved the scissors so much that I kept it. I have so many odd findings that it is nice to use them in these little projects.

Sunday, September 19, 2010

Christmas Tag

Today I Created | An embossed and stamped Christmas Tag

I started with a tag embossed with two different patterns. I first sprayed dark gray and red Glimmer Mist on the embossed tag. Once this was dry, I sanded the raised, embossed areas.

For the overall pattern at the top, I rubbed Perfect Medium and then applied Perfect Pearls on the raised areas. This created the gold highlights.

I used Versamark watermark ink on an Inkadinkado clear stamp to create the bird in the green circle.

Finally I used some metallic numbers to finish off the December 25th theme.

I really like how the watermark ink created such a subtle design on the dark green paper.

Saturday, August 28, 2010

Another Disk Experiment


Today I Created | A stamp-resist, alcohol ink disk.

I applied alcohol inks on a clear CD disk. Next I used Archival ink (black, but any color will do) to stamp on top of the alcohol inks. I used a fairly solid pattern of rubber stamp as the design.

Immediately after applying the rubber stamp ink I rubbed it off with a paper towel. The rubber stamp ink and the alcohol ink lifted off of the plastic leaving a clear area.

I love this technique.

Friday, August 27, 2010

Alcohol Ink experiment

Today I Created | A decorated CD using alcohol inks.

I like creating things out of recycled items. I found that there are unprinted blank CDs used in packaging the unwritten blank CDs. These seemed like the perfect medium to create art using alcohol inks.

On this sample I applied alcohol inks and then rubber stamped a swirl pattern with StazOn blank ink. On the opposite side I applied a thick coating of Rock Candy crackle paint. This wasn't as visually interesting as I had hoped. I stamped brown ink on top of the dried crackle paint to add interest.

I learned that crackle paint works best on porous surfaces.

Tuesday, August 10, 2010

Halloween Tag


Today I created | An embossed Halloween tag.

I'm not a big "tag maker". I've never made a tag before.

This tag was cut using the eclips shape cutter. I embossed the spider web using one of the new Tim Holtz Texture Fades. Next I inked and painted and added Perfect Pearls and inked some more until it looked pretty distressed. I stamped the words "Happy Halloween" on adhesive-backed, cotton tape from cutetape.com. The hole reinforcer is also from cutetape.com.

The key might be a real skeleton key that I had in my stash. I curled some wire and used it to attach the key. I tied it off with some green velvet ribbon.

Lots of work for one tag. But since the purpose of this Blog is to stretch my creative wings and try new things then this all made sense. Tags are perfect little "canvases" for art to be created and then given away.
Related Posts Plugin for WordPress, Blogger...