Showing posts with label Graphics Fairy. Show all posts

Sunday, March 29, 2015

Painted Gold-Trimmed Easter Eggs

Easter is just around the corner and I finally had a chance to design some Easter Eggs. I wanted to use some paper maché eggs that I had thrifted and to try using a rather unusual collage material.
I began with some lovely French images from the Graphics Fairy. Now here is the unusual collage part, I had some {unused} toilet seat covers that were not properly die cut so as to make them impractical for their intended purpose. These were to be discarded from the office so I saved a couple of sheets to experiment with. I trimmed a seat cover into an 8" x 10 1/2" sheet and taped the corners to a standard piece of printer paper. I ran this through my inkjet printer to transfer the French graphics onto the very lightweight tissue surface.
I tore small sections of the tissue and used Mod Podge to create a collage on the eggs. I had to be careful because the tissue tends to disintegrate with moisture.
After the eggs were dry, I applied a light coat of Distress Paint.
To add some interest to the painted surface, I doodled on each egg using gold Sizzix InkSheets. I also added some gold ribbon, washi tape, lace and vintage buttons to finish off each egg.
This was the first time that I used the InkSheets and I could see some fun possibilities. I also learned that it is possible to print on very thin tissue. If you try using either technique, please add a comment and let me know what you think. Hope everyone had a fun weekend.

Sunday, March 13, 2011

Designer Crafts Connection Blog Hop - Weddings

Welcome to the beginning of the Designer Crafts Connection blog hop. The designers will all work on a monthly theme and you can hop through all of the blogs using the Designer Crafts Connection blog hop button on the right.

This month's theme is "Weddings". Because of my interest in vintage items, I have been noticing a trend toward indie weddings using vintage and thrifted items to decorate both the wedding and reception venues with DIY projects. This has been the inspiration for my Wedding projects that I created for this blog hop.

THE TABLESCAPE

I envisioned the centerpiece on each guest table to have a small vignette of old books, vintage silver and glass. All of the accessories were thrifted (except for the candy.)

I wanted to create the table tent in craft paper but I didn't have any craft paper cardstock. I decided to get creative and used a grocery bag. I cut open the bag along the seams and then ironed it. (Surprising how your family will take notice if they see you ironing a grocery bag.) Next, I used adhesive to adhered it to a piece of cardstock that was the right weight that I needed. 

I cut the Table Tent out of a new Sizzix die that I designed (available April 2011.) I first embellished it with the Ornate Label and Paper Rosette die cuts. The Rosette was created using old sheet music. The button and millinery flowers are vintage. The heart lace was thrifted here. I soaked the lace in tea to give it a more vintage color. (My family noticed my odd choice of beverage too.) As a final piece of embellishment, I added some duck feathers as part of the overall decoration theme. The feathers were gifted from these guys

I also designed these vintage spool placecard holders at the center of each guest table. They would hold baby photos of the bride and groom. These images are from the Graphics Fairy. I used vintage spools, lace, ribbon and buttons to create these. The tutorial is here. I also added more duck feathers.

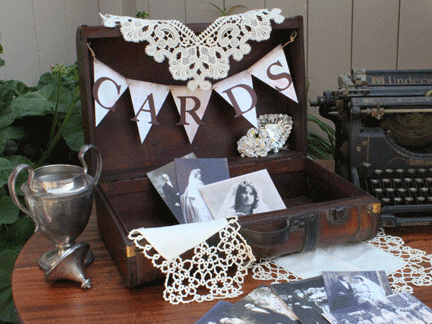
GIFT CARD RECEPTACLE

To continue the vintage theme, I decorated a thrifted, wooden suitcase to hold gift cards for the wedding couple. I die cut the letters using the Serif Essentials dies and attached them to triangle banners. 

I used wedding images from the Graphics Fairy and a vintage lace collar along the top of the case.

BOUTONNIERE

The groom's boutonniere was created using duck feathers, millinery flowers, vintage lace and a vintage button.

I used a short piece of wire (about 6 inches folded in half) and added a pearl drop bead to hang from the bottom. I used another shorter piece of wire to start wrapping the duck feathers and millinery flowers onto the folded wire away from the drop bead. Once I was happy with the arrangement, I used florist tape to wrap the wires securely. Next I wrapped the tape with lace. I used another short piece of lace to hold the pin-back and then tied it into a knot on the front. I glued a vintage button on the front to complete the look.

GIFTS FOR THE WEDDING PARTY


Another part of the wedding decorations I envisioned were "Thank You" gift boxes for the wedding party members. I created a side table to display the decorated pillow box.


To create the box, I started by adhering the grocery bag to another sheet of cardstock and then die cut a Pillow Box. I inked the edges to add dimension. Next I took a vintage hanky and wrapped it around the box. I die cut a Ticket Strip out of cardstock and attached it to the sides of the box to hold the hanky in place. I did not want to adhere the delicate hanky to the box. I embellished the ticket strip with another Ornate Label, more vintage heart lace and added a pearl-looking button as an accent.

I had so much fun creating all of these projects. The amazing thing was that, in all of these photos, the only two items I had to purchase for these specific projects were the alligator clips used in the vintage spool photo holders and the candy in the very first photo. Even the lemons in the lemonade were from a friend's garden.

Hope you enjoyed my vision of a DIY/Vintage Wedding theme. Please use the Designer Crafts Blog Connection button on the right to continue through the blog hop. Thank you for visiting.


This is linked to:
A Little Knick KnackAll Thingz RelatedBetween Naps on the Porch, Blue Cricket Designs, Brambleberry Cottage, Chic on a ShoestringCoastal Charm, Common Ground, Craft EnvyCreative EverydayDIY Home Sweet Home Project, FaveCrafts, Finding FabulousThe Girl CreativeGraphics Fairy, House of GraceI {heart} Nap Time, I'm Topsy TurvyKeeping It Simple, Krafty Kat, Lovely Crafty HomeMaking the World Cuter, My Backyard Eden, My Romantic HomeMy Uncommon Slice of Suburbia, Paisley PassionsPassionately ArtisticRook No. 17, Simply DesigningSkip to my Lou, Someday Crafts, The Shabby Chic Cottage, The Shabby NestSomewhat SimpleThe Thrifty HomeThe Trendy Treehouse, Truly LovelyUnder the Table and Dreaming, Very Merry Vintage Style and What Allie's Making Now

Sunday, February 6, 2011

Valentine Pocket Pages

I am so excited because I created some die designs for Sizzix. They are all Bigz Pro dies so they make big, practical things.

This die is called Pocket Page & Tag. From one sheet of 12"x12", two-sided, scrapbooking cardstock, you can create a two-sided pocket page and tag. You can create an entire mini pocket album or I designed it to fit on two rings of a three-ring binder to hold bits of paper so that they don't get lost.

This photo shows a single page on the left as well as an embellished mini-album on the right.

The next three photos show how two pocket pages are created from a single piece of paper.


The pages are really simple to fold and then you can begin to embellish. I chose to make this a Valentine mini-book. I still have a lot of embellishing and personalizing to do to this mini-album but I wanted to share what I have done so far.

The back cover (left page below) is embellished with the Flowers, 3-D die and inside the pocket is an old Valentine image from the Graphics Fairy that I printed and cut out.


The left page below has a butterfly from the new Tim Holtz, Mini Butterflies Set.

I used the Paper Rosette die on the left page below.  

More pages embellished with hearts, lace, ribbon and flowers. The flower on the right has one of the decorated brads that I made using images from the Graphics Fairy.

Another Valentine image fromt the Graphics Fairy. The page on the right has some vintage buttons and a vintage number 14 marker.

I die cut six, two-sided pages (total of 12 pages) and tags. I decorated these for Valentines Day but there are so many ways to embellish both the pockets and the tags. Plus these pages can be used in practical ways such as holding coupons, receipts or ATCs. The folded page size is 4"x6".

I am just so thrilled to be able to say that I designed this die! I hope you enjoy this sneak peek.

This is linked to 504 MainBlue Cricket Design, Chic on a Shoestring, Craft EnvyCrafts Keep Me Sane, Creative Everyday, Fave CraftsFinding Fabulous, I {Heart} Naptime, It's a Very Cherry WorldKrafty Kat, Lovely Crafty HomeMaking the World Cuter, My Backyard Eden, My Romantic HomePaisley Passions, Passionately ArtisticThe Shabby Nest, Simply DesigningSomeday Crafts, Somewhat Simple, Tatertots & JelloThese Creative Juices, The Trendy Treehouse, Under the Table & DreamingWildflowers & Whimsy and The Girl Creative.

Monday, January 31, 2011

ATC Valentine Suitcase

Today I Created | A Suitcase to hold Valentine ATCs.

This is a sneak peek at some of the new Sizzix dies that will be available in the next few months.

This suitcase by Eileen Hull is fantastic and so versatile. Here I used it as a little case to hold some ATC cards. The front is decorated with a vintage Hearts playing card, an embossed heart, a new Mini Movers and Shapers Crown and a rubber stamp.

The back is covered with a French postcard image from the Graphics Fairy, a Paper Rosette die, a ticket and a Prima Pebble.

ATCs fit nicely within the suitcase. This first card is an image from the Graphics Fairy. I also added some die cut leaves, a spiral paperclip and a heart brad.

This ATC is embossed with the new Tim Holtz Texture Trade Queen of Hearts card and Paper Tape.

The third card is a print from my vintage French dictionary. It is embellished with a satin fabric heart, an image of the Eiffel Tower from the Graphics Fairy and held together with a vintage pin that I found in a jar of buttons at an estate sale.

The suitcase die will be available in May. The Queen of Hearts Texture Trade embossing folder as well as a King and Jack card will be available in February.

This is linked to A Little LovelyBetween Naps on the Porch, Blue Cricket Design, Chic On a ShoestringCommon Ground, Craft EnvyCreative Everyday, Creative JuicesGraphics Fairy, I {Heart} NaptimeKeeping It Simple, Krafty Kat, Lovely Crafty HomeMaking the World Cuter, Me and My Bucket, Paisley PassionsPassionately ArtisticShabby Chic Cottage, The Shabby Nest, Simply DesigningSomeday Creative, Somewhat Simple, Tatertots and JelloUnder the Table and DreamingWildflowers & Whimsy and  The Girl Creative

I'm thrilled to be featured at Krafty Kat. Thank you!

Thursday, January 13, 2011

Vintage Bookcover

Today I Created | A vintage-looking bookcover

I saw an awesome notebook at PB that had a collage of vintage images and was inspired to create something similar. I began by creating a collage of several images from the Graphics Fairy and decided to use it to create my own vintage looking bookcover.

I only have an 8.5" x 11" printer so the paper size was limited. I was able to select the option of having the image print to the edge of the paper so the finished piece was truly 8.5" x 11". This was important because this creates a very small bookcover at best.

I grabbed every small hardback book I had but all of them were too large to be covered by one sheet of paper. As a last resort I pulled out an old paperback and decided to just cover that if it would fit.

Luckily it fit perfectly. And not only that, it gave the paperback book a vintage look. Eventually I would love to cover different sized books but until then I can enjoy some inexpensive paperbacks that just look expensive.


All of the images are from the Graphics Fairy except for the postage stamps and the postcard of the Tower Bridge which are from my personal collection.

This is linked to The Graphics FairyLovely Crafty HomeUnder the Table and Dreaming and The Shabby Nest.

Sunday, January 9, 2011

Valentine Heart Tartlet Assemblage

Today I Created | A Heart Tartlet Assemblage

I bought these Swedish Tartlet pans at an estate sale yesterday. I envisioned Valentine projects with the heart-shaped tins.

My first project was to use Cranberry colored Alcohol Ink in the center since this one particular tin had a flawed finish and the color would hide some of the scratches. I placed three drops of the ink in the center and tipped the tin to allow the ink to flow up each of the side grooves. I liked how this looks like rays emanating from the heart.

I embellished it simply by adding a smaller distressed banner with a stamped sentiment.

For this second Tartlet Assemblage I found this adorable image from the Graphics Fairy blog. I sized it to fit the tartlet tin, printed it on cardstock, trimmed it and edged it with tinsel ribbon. The last step was to adhered it to the center of the tartlet tin.

This is linked to the Graphics Fairy, Apron Thrift GirlCreative Every DayKeeping It Simple, Making the World Cuter, House of Grace, Someday Crafts, Blue Cricket Design, The Shabby Chic Cottage, Trendy TreehouseFaveCrafts and Between Naps on the Porch.

Addendum: I have posted a third Valentine Heart Tartlet Assemblage.

Tuesday, January 4, 2011

Printed Mini Art Canvas

Today I Created | A printed mini art canvas.


I once saw something like this hanging on a wall in the background of magazine photo. It looked warm and inviting in a kitchen so I wanted to duplicate the look by printing on canvas and wrapping it on canvas stretcher bars. Not having real art canvas and stretcher bars, I used supplies in my stash.

I found the Fork, Knife and Spoon image on the Graphics Fairy blog here. I rotated the knife in the original image. Next I placed the image on a digital grunge background that I had purchased from a stock photography site several years ago. Once I was happy with the size and the placement I printed it on Avery Printable Fabric (available at office supply stores).

I had a pack of plain, small wooden frames from Ikea so I used them as my canvas stretcher bars. I used extra sticky tape on the back of the bars and wrapped the canvas around to the back. I designed the grunge image to wrap around the sides of the stretcher bars.

Here are the supplies I used.


Addendum: This was highlighted on These Creative Juices. Thank you!

Monday, December 27, 2010

Altered Anthropologie Frame

Today I Created | An Altered Frame from an old Anthropologie Frame

My boyfriend found this for me at a Goodwill store. He has started to develop an eye for things that can be altered. This is what the finished frame looks like now after it has been altered.


Originally the frame was lime green. I lightly sanded it and painted it with white acrylic paint just to give it a good working surface. While the paint was drying, I printed some postcard images from the Graphics Fairy. There were so many nice images to choose from but I wanted to keep things neutral and let the faux paper colors and textures be the design. I did include a real vintage English postage stamp that I had from my childhood stamp collection.


I applied the postcard images to the prepared frame using Mod Podge. I don't know how I went through the 60s and 70s without decoupaging something since I think I did every other craft available during that period (Personally I'm waiting for macrame to make a comeback). Anyway, I had fun using Mod Podge.

I reassembled the frame once it was dry. There is space inside of the frame to place a small object. I haven't decided what I want to put in there yet.

Here are two photos of the original frame when it was lime green. It still had a price tag from Anthropologie. The original price was $32 marked down to $14.95 then on sale at Goodwill for $2.99 and I bought it for half-price at $1.50. Not bad for a frame from Anthropologie.


I am honored to have this bragged about on Brag Monday at the Graphics Fairy. Thank you!
I am also honored to be mentioned on Frugal with a Flourish. Thank you!

Sunday, December 19, 2010

Christmas Apothecary Jar Centerpiece

Today I Created | A Christmas Tablescape inside an Apothecary Jar

I was inspired by a beautiful idea in the PB catalog. I recreated it but at a fraction of their cost.


The apothecary jar is from Michaels that I bought on sale with a coupon. The bird in the center is actually metal that I found at a garage sale years ago. The bird has a lovely Shabby Chic finish so I didn't want to cover it with glitter. I printed music sheets from the Graphics Fairy and trimmed them into 3/4" strips. I rolled these around a pencil to create curls.

I had small pinecones that I first dipped in white paint and then glitter. The "snow" is fiber batting covered with Sparkle Christmas Snow from Anthropologie.

As a final touch, I took a piece of off-white ribbon and stamped "Merry Christmas" several times then tied it around the top of the lid.

The total cost for everything in my tablescape is about $25. At the PB, the apothecary jar alone costs $69 empty.

This is linked to TheGirlCreative.

Tuesday, December 14, 2010

Christmas Pop-up Gift Card Holders

Today I Created | Christmas Pop-up Gift Card Holders

Well, I already borrowed part of this idea from Karen Burniston so I decided that I may as well borrow a bit more. I just couldn't resist how she made her Twist Cube die pop up and hold a gift card so I decided to make my own version. Here's what she did for the Triple Play Blog Hop. Isn't it amazing! You can see why I couldn't resist this idea. Since I had to make so many of these I am not putting them in a card but rather the pop-up Twist Cube is the gift.


I used several different styles of Basic Grey Christmas papers. I used the double-sided Christmas papers to create the bows using the Sizzix Create-a-Bow die.  I used single-sided papers for the Twist Cube shape. I made my own "tags" that actually holds the gift cards. I pretty much wiped out my stash of Basic Grey Christmas papers so I think some shopping is in order.


When the Twist Cube is closed, the tag says "Merry Christmas". I used the Santa and Reindeer image from the Graphics Fairy and layered it in Photoshop to create the front of the tag.


When the Twist Cube is opened then the tag reveals the gift card and says "For You". I used the Holly Sprig image also from the Graphics Fairy. Below is a better view of what the tag looks like before it is folded and trimmed.

Hope you enjoy this and a big thank you to the two Karens that inspired this; Karen Burniston and Karen the Graphics Fairy.

I linked this to the Graphics Fairy and Favecrafts, Finished on the Fifteenth.

Monday, November 22, 2010

Song Birds

Today I Created | Glittery Song Birds

I wanted to create something cheery since the weather has been gloomy here. I created chipboard birds to brighten my day.

I used a sheet music image from the Graphics Fairy. This was printed on paper and glued to chipboard. Next I die cut them using Sizzix Birds die.

I inked the edges using Worn Lipstick, Distress Ink then applied Mod Podge over the entire bird shape and added glitter.


I glued these to painted clothes pins, added some weight to the bottom of the clothes pins (weights are  necessary only if nothing is hung below the birds) and hung them up. I also plan to use these on my Christmas tree.

This project has been shared with the Graphics Fairy, ApronThriftGirl and Making the World Cuter.
Related Posts Plugin for WordPress, Blogger...