

Showing posts with label Repurposed. Show all posts
Showing posts with label Repurposed. Show all posts
Sunday, July 27, 2014
Paper Succulent Garden
What do you get when you combine the popular succulent gardens with the trend of decorating in creamy white color schemes and the desire to recycle thrifted treasures? The answer is a DIY paper succulent garden.
Thursday, September 27, 2012
Tiny Tiered Tart Pan Tidbit Tray
The name of this post is a bit of a tongue twister.
I like tiered tidbit trays. They make me feel like a party is about to happen even when used as an everyday organizer. I decided to create a variation of a tidbit tray when I found some tiny tart pans at an estate sale recently. The largest tart pan is only 3 3/4" across.

I like tiered tidbit trays. They make me feel like a party is about to happen even when used as an everyday organizer. I decided to create a variation of a tidbit tray when I found some tiny tart pans at an estate sale recently. The largest tart pan is only 3 3/4" across.
Saturday, September 22, 2012
Office Decorating Update - Button Magnets
I have been slowly adding more repurposed vintage items to my office at work. First I created my non-corporate nameplate using Scrabble tiles and an old ruler. Then I repurposed a painter's dropcloth as a backdrop to my cubicle walls and added rosette clips here. And then I repurposed a vintage doll suitcase as my inbox.
Recently I started using a vintage metal child's chalkboard desk as a bulletin board in my office. Here is what it looked like originally. I am using just the desktop part as the magntic board but it needed some special magnets.
I searched through my button stash and used almost all of the aqua buttons for this project. I glued them into stacks of either two or three button high and then onto magnets. I can also use them for the office Bingo game.

 This project was so simple and it just brightens up my office wall.
This is linked to:
Bowdabra Blog, Cherished Treasures, Craft Envy, DIY Showoff, Hey Whats for Dinner Mom?, Homemaker on a Dime, I {heart} Naptime, Marvelously Messy, Mod Vintage Life, Sew Can Do, Sumo's Sweet Stuff, The Girl Creative and The Southern Institute
Recently I started using a vintage metal child's chalkboard desk as a bulletin board in my office. Here is what it looked like originally. I am using just the desktop part as the magntic board but it needed some special magnets.
I searched through my button stash and used almost all of the aqua buttons for this project. I glued them into stacks of either two or three button high and then onto magnets. I can also use them for the office Bingo game.
This is linked to:
Bowdabra Blog, Cherished Treasures, Craft Envy, DIY Showoff, Hey Whats for Dinner Mom?, Homemaker on a Dime, I {heart} Naptime, Marvelously Messy, Mod Vintage Life, Sew Can Do, Sumo's Sweet Stuff, The Girl Creative and The Southern Institute
Sunday, August 5, 2012
Designer Craft Connection - August
Welcome to the Designer Craft Connection Blog Hop for August. This month's theme is designing with school supplies. This was an exciting challenge because I happened to have a lot of vintage school supplies gathered from my thrifting adventures.
My favorite school supply that I collect are old wooden rulers. They look so lovely as they age and are quite varied in their appearance. I began with the idea of covering a lamp shade with rulers but with a bit of luck at my local Goodwill my project became more unique. I began with 24 vintage rulers and a boxy, pink polka dotted lamp {sorry there are no "before" photos} then using hot glue, I attached the rulers to the sides.

My favorite school supply that I collect are old wooden rulers. They look so lovely as they age and are quite varied in their appearance. I began with the idea of covering a lamp shade with rulers but with a bit of luck at my local Goodwill my project became more unique. I began with 24 vintage rulers and a boxy, pink polka dotted lamp {sorry there are no "before" photos} then using hot glue, I attached the rulers to the sides.
Monday, May 14, 2012
Vintage Office In-Box
I was planning on using an old wire basket as my vintage office in-box but that almost seemed too predictable. I was inspired to use one of my vintage doll suitcases instead. It definitely has a lot more charm than anything else I could imagine.
Here is my new in-box and you can click through to read the story of the first item I found in there.
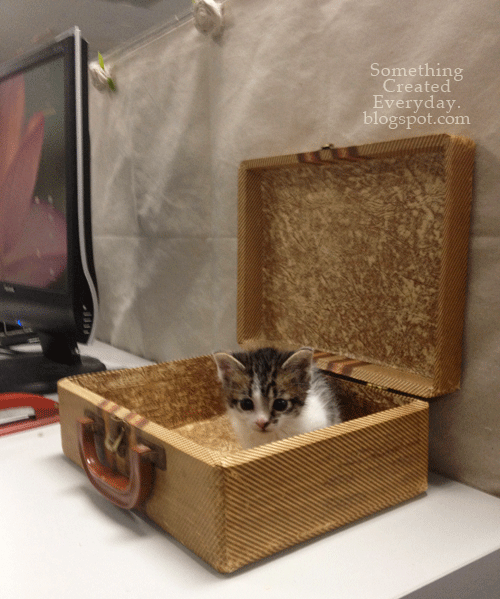
Here is my new in-box and you can click through to read the story of the first item I found in there.
Saturday, November 26, 2011
Beach Retreat Bathroom UPDATE
I finally found everything I needed to complete my Beach Retreat bathroom. You can see the first reveal here. The only thing I was missing was a place to hang towels. I needed the right shelf and planned on using vintage glass door knobs. I found something even better last week.
Here is how it came together.
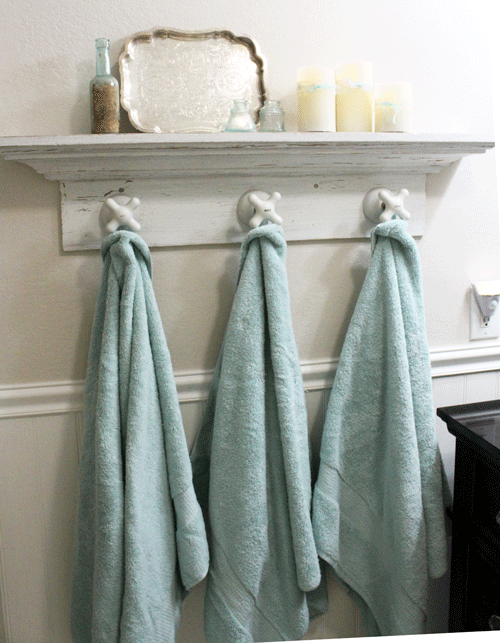
The shelf is from CostPlus. I removed the original hardware, painted it white and distressed it.

The knobs are old porcelain fixtures that we found at a garage sale in West Hollywood last week. They were old and dirty when we found them. I forgot to take a before photo of these still attached to the original brass piping. Dear Handyman had to work his magic to find new piping with the right thread and make it all come together.

Now I can display some vintage treasures on the shelf as well as have the perfect place to hang towels. I sewed a piece of seam binding to the edge of the towels to allow them to hang nicely.
I am honored to be featured at:

This is linked to:
Between Naps on the Porch, Blue Cricket Design, Brambleberry Cottage, Cherished Treasures, Chic on a Shoestring, Coastal Charm, Common Ground, Designer Garden, DIY Home Sweet Home, Homemaker on a Dime, Keeping it Simple, Life Made Lovely, Making the World Cuter, Marvelously Messy, My Romantic Home, My Uncommon Slice of Suburbia, Passionately Artistic, Rook No.17, Savvy Southern Style, Sew Can Do, Sew Much Ado, Singing Three Little Birds, Skip to My Lou, Someday Crafts, Somewhat Simple, Sumo's Sweet Stuff, The Colorado Lady, The Girl Creative, The Shabby Creek Cottage, The Shabby Nest, The Southern Institute, The Thrifty Groove, The Trendy Treehouse, Thrifty Decorating, Type A Decorating, Very Merry Vintage Style and What Allie's Making Now
Here is how it came together.
The shelf is from CostPlus. I removed the original hardware, painted it white and distressed it.

The knobs are old porcelain fixtures that we found at a garage sale in West Hollywood last week. They were old and dirty when we found them. I forgot to take a before photo of these still attached to the original brass piping. Dear Handyman had to work his magic to find new piping with the right thread and make it all come together.

Now I can display some vintage treasures on the shelf as well as have the perfect place to hang towels. I sewed a piece of seam binding to the edge of the towels to allow them to hang nicely.
I am honored to be featured at:
This is linked to:
Between Naps on the Porch, Blue Cricket Design, Brambleberry Cottage, Cherished Treasures, Chic on a Shoestring, Coastal Charm, Common Ground, Designer Garden, DIY Home Sweet Home, Homemaker on a Dime, Keeping it Simple, Life Made Lovely, Making the World Cuter, Marvelously Messy, My Romantic Home, My Uncommon Slice of Suburbia, Passionately Artistic, Rook No.17, Savvy Southern Style, Sew Can Do, Sew Much Ado, Singing Three Little Birds, Skip to My Lou, Someday Crafts, Somewhat Simple, Sumo's Sweet Stuff, The Colorado Lady, The Girl Creative, The Shabby Creek Cottage, The Shabby Nest, The Southern Institute, The Thrifty Groove, The Trendy Treehouse, Thrifty Decorating, Type A Decorating, Very Merry Vintage Style and What Allie's Making Now
Tuesday, September 6, 2011
Repurposed Tea Light Holder
I'm still in the middle of remodeling my bathroom but I have been looking around my home for items to use as accents once everything is completed. Here is a simple repurposed project I created.

This Tea Light Holder was created using a wire basket that originally held small clay pots. I thrifted this here.
I used two glass Insulators that I thrifted here and turned them upside-down inside the wire basket.
I placed a flameless tea light inside each one to create a teal glass candle holder that I will use to decorate my bathroom {once I make up my mind and stop changing the wall color}.

This is linked to:
504 Main, A Little Knick Knack, All Thingz Related, Beyond the Picket Fence, Blue Cricket Design, Brambleberry Cottage, Chic on a Shoestring, Coastal Charm, Common Ground, Creating a House of Grace, French Country Cottage, Frugalicious Me, Just a Girl, My Romantic Home, My Uncommon Slice of Suburbia, Passionately Artistic, Savvy Southern Style, Sew Much Ado, Rook No. 17, Running With Glitter, Simply Designing, Somewhat Simple, Tales From Bloggeritaville, The 36th Avenue, The Colorado Lady, The Shabby Creek Cottage, The Shabby Nest, The Thrifty Home, The Trendy Treehouse, Thrifty Decorating, Type A, Very Merry Vintage Style, Vintage Wanna Bee and What Allie's Making Now
Subscribe to:
Posts (Atom)