Showing posts with label Valentines. Show all posts

Tuesday, February 18, 2014

Belated Valentine's Post

I made a Valentine's card for my Dear Handyman. He told me that he saves all of the cards that I make for him which makes me so happy.
I started with a box cut using the eclips machine. I made the flower using the Sizzix Tattered Pinecone die then inked and distressed the edges of the petals. I added a bit of lace, greenery and a small tag to finish off the front of the box.

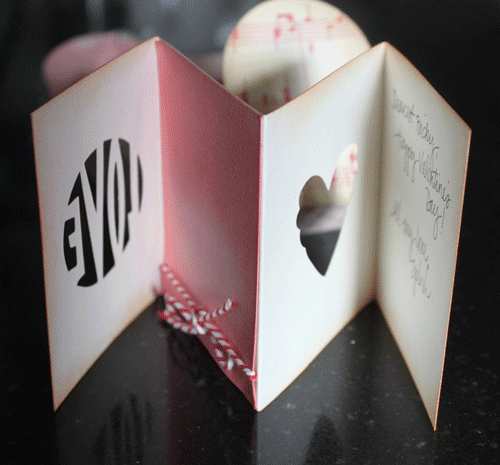
When the box was opened there was a simple card.

I began with a 12" x 3" strip of cardstock and accordion folded it. I used the Alterations Magnetic Movers & Shapers Die; Love on the front of the card. This die is discontinued but I think it is so perfect for a simple card.
I kept the various panels very simple so that the shapes stood out.
I also used a Movers & Shapers Heart die on the inside page.

I'm so glad that my Dear Handyman appreciates the cards that I make for him. Just one more reason why I love him.

Monday, February 14, 2011

Scrabble Board Valentine's Day Card

Valentine's Day is finally here. And I can't help it but I just couldn't make a regular Valentine's Day card for my boyfriend. I knew that I wanted to do something unique and finally decided to upcycle a Scrabble board since it folded like a giant card and I could use the tiles to spell out my sentiment.

I cut lots of little rectangles from various pink shades of Basic Grey papers. I needed a light, medium and dark selection for the heart pattern to work. I adhered them with Mod Podge which worked well but I decided that it was best not to fold the board after the Mod Podge dried to avoid cracking.
Happy Valentine's Day!

This is linked to:

Wednesday, January 26, 2011

Truly Vintage Valentine Tag

Today I Created | A truly vintage Valentine Tag

For this tag I used several vintage pieces. My favorite piece is the actual Valentine card given to me by my "boyfriend" in fourth grade. It was extra special because, printed on the card, it said "I love you" and to a nine year old girl that meant true love. At one point I had used cellophane tape to hold this card in one of my first scrapbooks. You can see the discoloration on her feet.

Behind the card I used bits of my daisy lace that I bought at a garage sale. The old red and white sticker is something that I had in my stash. The button is a recent find from an estate sale. The only pieces that are new are the ribbons and the black cardstock.

This is linked to Kard Krazy.

Friday, January 14, 2011

Valentine Heart Both Sweet and Tart

Today I Created | A Valentine heart tartlet that is both sweet and tart to go with my other heart tartlets.


I started off using the Sizzix Angel Wings die and cutting two matching wings out of Grunge Paper. Next, I embossed them with the Tropical Paisley Textured Impressions.

I used Barn Door, Distress Ink to color the wings. While they were still damp I used a brayer and rolled white acrylic paint over the surface which turned pink. When the wings were dry I applied Mod Podge and clear glitter.

Meanwhile I found a large red button and tied embroidery floss in the center. I glued lace around the edges and then hot glued it to the center of one of the Swedish Tartlet pans that I bought at an estate sale. This made the heart look very sweet.

The final part was to adhere the wings to the back of the tartlet pan. As I was deciding where to glue the wings I noticed that at this angle they have a little piece that shows near the bottom sides of the heart. This gave it a bit of a goth appearance. Maybe painted black and silver would make these look perfect for Halloween decorations. A Valentine heart both sweet and tart!

This is linked to Lovely Crafty Home.

Sunday, January 9, 2011

Valentine Heart Tartlet Assemblage

Today I Created | A Heart Tartlet Assemblage

I bought these Swedish Tartlet pans at an estate sale yesterday. I envisioned Valentine projects with the heart-shaped tins.

My first project was to use Cranberry colored Alcohol Ink in the center since this one particular tin had a flawed finish and the color would hide some of the scratches. I placed three drops of the ink in the center and tipped the tin to allow the ink to flow up each of the side grooves. I liked how this looks like rays emanating from the heart.

I embellished it simply by adding a smaller distressed banner with a stamped sentiment.

For this second Tartlet Assemblage I found this adorable image from the Graphics Fairy blog. I sized it to fit the tartlet tin, printed it on cardstock, trimmed it and edged it with tinsel ribbon. The last step was to adhered it to the center of the tartlet tin.

This is linked to the Graphics Fairy, Apron Thrift GirlCreative Every DayKeeping It Simple, Making the World Cuter, House of Grace, Someday Crafts, Blue Cricket Design, The Shabby Chic Cottage, Trendy TreehouseFaveCrafts and Between Naps on the Porch.

Addendum: I have posted a third Valentine Heart Tartlet Assemblage.
Related Posts Plugin for WordPress, Blogger...