

Showing posts with label Designers Craft Connection. Show all posts
Showing posts with label Designers Craft Connection. Show all posts
Sunday, November 3, 2013
Designers Craft Connection - Thank You Gift
Welcome to the Designers Craft Connection Blog Hop for the month of November. This month's theme is a "Thank You Gift". I am especially thankful that Dear Handyman and his son-in-law both like to cook and barbeque so we will have a feast on Thanksgiving. Since I enjoy crafting more than cooking, my Thank You Gift is a Thanksgiving Table Runner.
The fun part about this felt table runner is that everything is thrifted. I began with a stack of felt that I found at an estate sale two years ago. There was only a small handful of felt scraps left after I cut everything that I needed.

Tuesday, September 3, 2013
Designers Craft Connection Blog Hop September - Vacation Memories
Welcome to the Designers Craft Connection Blog Hop for the month of September. The theme this month is to display vacation memories and often these include souvenirs that are too bulky to fit inside a scrapbook. I created a solution to hold all of the little things that make up vacation memories.
 I love little drawers and I especially love when they are bright and colorful. I made these drawers using the Sizzix Box, Candy Drawer die by Eileen Hull. This works best using board stock but I wanted to use lots of my two-sided card stock in my stash. It worked well because I attached all of the boxes to each other so they have added stability. Plus I love the Summery colors of the papers.
 I began by digging through all of my stash then die cutting and folding all of the pieces needed to make nine drawers. Once I decided how I liked the order of the boxes to appear I glued the adjacent sides and tops to form a stack of three boxes across by three boxes high. I used a 1/2" circle punch to create the finger hole on each drawer front.

 I filled the drawers with little items that I've collected from various vacations over the years. I have squished pennies from lots of tourist locations, tiny sea shells from different beaches and stamps from around the world {mostly dream vacation spots}. I also included some items that I've collected while thrifting on vacations.
I used some small items as drawer pulls to highlight what is inside the drawers. A tiny sea shell and button add interest to the front of the drawers.
You can create a set of these drawers or keep adding to this group of drawers every season. This is such a fun way to organize little items. They hold fond memories of Summer vacations.
Please use the DCC blog hop button on the right to continue to get inspired by the many creative designers of the Designers Craft Connection blog hop.
This is linked to:
Lamberts Lately


I used some small items as drawer pulls to highlight what is inside the drawers. A tiny sea shell and button add interest to the front of the drawers.
You can create a set of these drawers or keep adding to this group of drawers every season. This is such a fun way to organize little items. They hold fond memories of Summer vacations.
Please use the DCC blog hop button on the right to continue to get inspired by the many creative designers of the Designers Craft Connection blog hop.
This is linked to:
Lamberts Lately
Sunday, August 4, 2013
Designers Craft Connection Blog Hop - August
Welcome to the Designers Craft Connection Blog Hop for the month of August. This month's theme is Crafting with School Supplies. My favorite school supply is vintage wooden rulers. I love finding old wooden rulers and yard sticks at estate sales because they are everyday objects that have so much design potential.
My School Supply crafting project is an easel and slate chalkboard both made from thrifted, vintage rulers.
 I started with a small vintage chalkboard and cut two rulers to frame the edges of the slate. I glued the rulers to the existing wooden frame and rounded the corners to match.
 The easel was made with three more rulers as the legs and an architect's ruler as the tray that supports the slate chalkboard.


 The chain helps to stabilize the easel.
I hope you enjoyed my vintage, thrifted school supply project. Please use the DCC blog hop button on the right to continue through to visit all of the amazingly talented designers involved with this blog hop.
My School Supply crafting project is an easel and slate chalkboard both made from thrifted, vintage rulers.

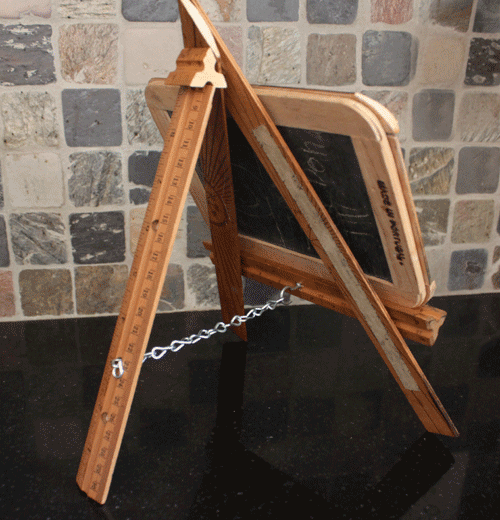

This side view shows how the architect's ruler supports the slate chalkboard.

I hope you enjoyed my vintage, thrifted school supply project. Please use the DCC blog hop button on the right to continue through to visit all of the amazingly talented designers involved with this blog hop.
Monday, June 3, 2013
Designers Craft Connection - Blog Hop June
Welcome to the Designers Craft Connection Blog Hop for the month of June. This month's theme is Happiness is Handmade. I decided to make something special to celebrate Father's Day and of course it was handmade.
 My project is a party banner made from neckties and dress shirts. I happened to find some nice neckties in a gray/blue theme so I went to my Goodwill and bought two blue men's dress shirts {half-price day!}.
I cut 7 inches off both ends of the neckties to use as parts of this banner. I cut the pockets off of the dress shirts and 7 inches of the shirt cuffs to include as flags. This would be extra cute if you had a large selection of inexpensive neckties but I only had three so I had to be thrifty.
 I used thrifted bias tape as the string, folded about an inch of each item over the string and attached by sewing. It would also be cute to place Father's Day cards or maybe a gift card for dad in the pockets.
 There is still plenty of time to gather up lots of inexpensive neckties and shirts at garage sales to make your own banners.
Hope you enjoyed this Handmade Happiness idea for fathers everywhere. Please use the DCC button on the right column to continue through the Blog Hop and enjoy the amazing talents of the many creative designers that are part of this group.
I cut 7 inches off both ends of the neckties to use as parts of this banner. I cut the pockets off of the dress shirts and 7 inches of the shirt cuffs to include as flags. This would be extra cute if you had a large selection of inexpensive neckties but I only had three so I had to be thrifty.

Hope you enjoyed this Handmade Happiness idea for fathers everywhere. Please use the DCC button on the right column to continue through the Blog Hop and enjoy the amazing talents of the many creative designers that are part of this group.
Sunday, May 5, 2013
Designers Craft Connection - May Blog Hop
Welcome to the Designers Craft Connection Blog Hop for the month of May. The theme this month is Handmade Wishes. I chose to do a project that would showcase items that were handmade by others a long time ago. As always, almost all of the supplies used are thrifted.
I often find beautiful crocheted doilies at estate sales. I know these pieces take a lot of time to make so I imagine that they hold many dreams and hopes within their intricately woven threads. I used several to create a wreath in celebration of the women who crafted these lacy pieces. This is my Mother's Day offering of handmade wishes to honor their handiwork.

 Next, I draped handmade doilies over the wreath while trying to vary the many shades of creamy white. I added lots of layers, including vintage {machine made} lace embellishments to creates texture.

 Next I draped several strands of faux pearls.
 Then added handfuls of rhinestone jewelry to add sparkle. I love how this is dripping with lace, pearls and rhinestones.

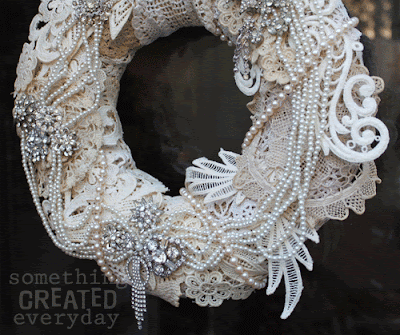
 My handmade wish is to honor everyone who patiently makes things by hand for the enjoyment of future generations.
Please use the DCC blog hop button on the right to view more awesome project created by a very talented group of crafters.
I am honored to be featured at:

This is linked to:
504 Main, Beyond the Picket Fence, Chic on a Shoestring Decorating, Coastal Charm, Common Ground, DIY Home Sweet Home, Elizabeth & Co, Faith, Grace, Crafts, French Country Cottage, From My Front Porch to Yours, Hey What's for Dinner Mom?, Lamberts Lately, Making the World Cuter, My Repurposed Life, My Romantic Home, My Uncommon Slice of Suburbia, Pieced Pastimes, Savvy Southern Style, Sew Can Do, Sew Much Ado, Simply Designing, Somewhat Simple, Sugar Bee Crafts, The 36th Avenue, The Colorado Lady, The Shabby Nest, The Thrifty Groove, The Thrifty Home, The Trendy Treehouse and Twin Dragonfly Designs
I often find beautiful crocheted doilies at estate sales. I know these pieces take a lot of time to make so I imagine that they hold many dreams and hopes within their intricately woven threads. I used several to create a wreath in celebration of the women who crafted these lacy pieces. This is my Mother's Day offering of handmade wishes to honor their handiwork.
I began with a wreath form and cut strips of burlap and wrapped it around the form.


Please use the DCC blog hop button on the right to view more awesome project created by a very talented group of crafters.
I am honored to be featured at:

This is linked to:
504 Main, Beyond the Picket Fence, Chic on a Shoestring Decorating, Coastal Charm, Common Ground, DIY Home Sweet Home, Elizabeth & Co, Faith, Grace, Crafts, French Country Cottage, From My Front Porch to Yours, Hey What's for Dinner Mom?, Lamberts Lately, Making the World Cuter, My Repurposed Life, My Romantic Home, My Uncommon Slice of Suburbia, Pieced Pastimes, Savvy Southern Style, Sew Can Do, Sew Much Ado, Simply Designing, Somewhat Simple, Sugar Bee Crafts, The 36th Avenue, The Colorado Lady, The Shabby Nest, The Thrifty Groove, The Thrifty Home, The Trendy Treehouse and Twin Dragonfly Designs
Sunday, March 31, 2013
Designer Crafts Connection Blog Hop - April
Welcome to the Designer Crafts Connection Blog Hop for the month of April. This month's theme is "Handmade Flowers" with an added challenge to create with things around the house. A perfect combination that is dear to my heart. I started looking through my stash and came across something I had been saving for a "someday" project, the pretty fabric bag that held my shabby chic duvet cover.
 The finished project is a canvas tote decorated with the Tattered Floral Sizzix die. The lining of my bag is the intact duvet cover bag {see the floral bag below}. For the outside of the bag, I used leftover painter's drop cloth from previous projects here and here. I first cut and sewed the drop cloth to match the size and shape of the duvet cover bag.
 Next I die cut some Tattered Florals out of more drop cloth material and applied a little Worn Lipstick Distress ink on the petal edges. This created the outer part of my flowers.
 I wanted to use a different material for the center of the flowers to add texture and interest. I found a vinyl bag of decorative sea shells sitting around. I cut a different flower shape out of the vinyl and used Cranberry and Butterscotch Alcohol Ink to color the narrower petals.
 I used embroidery thread and thrifted pearl beads to attach the flowers to the bag. At this point the flowers started to look like climbing Clematis. Using Broken China Distress ink, I added a hint of blue behind the flowers to tie in with the colors in the lining.

 I sewed handles and then stitched the bag together. This entire project was created using only items that I had around my house. I love doing projects like this.
I hope you enjoyed my Handmade Flowers. Please use the Forward/Back button on the right column to continue through the DCC Blog Hop for more amazing floral inspiration.
This is linked to:
DIY Home Sweet Home, Homemaker on a Dime, Making the World Cuter, Sew Can Do and Skip to My Lou


I hope you enjoyed my Handmade Flowers. Please use the Forward/Back button on the right column to continue through the DCC Blog Hop for more amazing floral inspiration.
This is linked to:
DIY Home Sweet Home, Homemaker on a Dime, Making the World Cuter, Sew Can Do and Skip to My Lou
Sunday, January 6, 2013
Designers Craft Connection Blog Hop - January
Welcome to the January issue of the Designers Craft Connection Blog Hop. I know that many of the participating Designers will be traveling to the Craft & Hobby Association trade show this coming weekend. I hope to have the opportunity to meet some of them in person. This is such a creative group!
The theme for this month's blog hop is "Handmade Home Décor". I chose to do something practical but a bit unique. My project is a pillow using an old Japanese technique.
 The uniqueness of this pillow is that it is neither square nor round. It has eight corners so is similar to a cube but it isn't a cube. And it is made from four pieces of fabric.
I once made this as a child and thought it would make a unique, if not hard to describe, home décor project. Here is another view.
 The complex shape makes this an interesting pillow. I used two different fabrics but it could be even more interesting if it had four various fabrics. I plan to experiment with other combinations and maybe make it a little smaller the next time.
Please use the Designers Craft Connection {DCC} button on the right to hop through more Handmade Home Décor inspiration ideas.
The theme for this month's blog hop is "Handmade Home Décor". I chose to do something practical but a bit unique. My project is a pillow using an old Japanese technique.
I once made this as a child and thought it would make a unique, if not hard to describe, home décor project. Here is another view.
Please use the Designers Craft Connection {DCC} button on the right to hop through more Handmade Home Décor inspiration ideas.
Monday, December 3, 2012
Designers Craft Connection Blog Hop - December
Welcome to the Designers Craft Connection Blog Hop for the month of December. This month's theme is "Handmade for the Holidays".
I am excited about this month's theme because; 1) I love making things, 2) I love the holidays and 3) I had a perfect idea for a dual-purpose project.
My sister and I exchange handmade ornaments every year. This year our theme was "Something Made of Paper". So combining the themes I created a "Tim Holtz Cuckoo Clock" ornament.


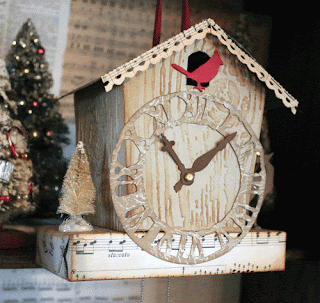

 I used hot glue to attach the house to the bottom box. I glued the clock face to both the house and the base. On the left side of the clock I added a small bottlebrush tree. On the right, I glued a small die cut Reindeer.
I hope you enjoyed my Handmade for the Holidays project. Please use the DCC Blog Hop button on the right to visit all of the talented designers and see their creative projects.
This is linked to:
Beyond the Picket Fence, Coastal Charm, Elizabeth and Co., Making the World Cuter, My Uncommon Slice of Suburbia, Savvy Southern Style, Sew Can Do, Sew Much Ado, Someday Crafts, Sugar Bee Crafts, The Shabby Creek Cottage, The Thrifty Home, The Trendy Treehouse, Topsy Turvy and Twin Dragonfly Designs
I am excited about this month's theme because; 1) I love making things, 2) I love the holidays and 3) I had a perfect idea for a dual-purpose project.
My sister and I exchange handmade ornaments every year. This year our theme was "Something Made of Paper". So combining the themes I created a "Tim Holtz Cuckoo Clock" ornament.
I began by covering a small box with old sheet music. This happened to be from The Nutcracker Suite in case anyone happens to notice. Before I sealed up the box I punched two small holes in the bottom of the box and ran a small chain through it leaving both ends hanging out of the bottom. I sealed up the box and used Distress inks to age the paper edges.

Using all Sizzix dies, I die cut two Tattered Pinecone pieces and followed Tim Holtz's video to create the pinecones hanging beneath the clock. I added some snowy glitter using white glue.

I cut out a House, 3-D and used the Woodgrain Texture Fade for added dimension to the sides. Again, using Distress inks I highlighted the raised texture. I cut an opening near the top arch and attached a small die cut Cardinal {more festive than a Cuckoo Bird}.

I die cut the Weathered Clock and first applied Tea Dye Distress ink as a background color. Next, I used Perfect Medium with an all-over pattern stamp and applied Perfect Pearls in Heirloom Gold. This created a random, worn metallic look to the clock face. Before assembling the clock/house I laid the clock face on the front and determined where the clock hands would be attached. I used a small brad to attach the hands then removed the clock face while I worked on the next steps.

I assembled the clock/house and decided that it needed a roof. I folded a piece of brown cardstock and ran both sides through my Vagabond die cutting machine using the Snowflurries Texture Fade. I sanded the raised surface to give it more texture. I also added a small piece of die cut Vintage Lace along the front edge of the roof. It is cut from more old sheet music and left over from a previous project. It gave the house a gingerbread roof line. I used a large needle to punch two holes in the roof and top of the house. I glued the roof to the house then strung a piece of vintage ribbon through the holes.

I hope you enjoyed my Handmade for the Holidays project. Please use the DCC Blog Hop button on the right to visit all of the talented designers and see their creative projects.
This is linked to:
Beyond the Picket Fence, Coastal Charm, Elizabeth and Co., Making the World Cuter, My Uncommon Slice of Suburbia, Savvy Southern Style, Sew Can Do, Sew Much Ado, Someday Crafts, Sugar Bee Crafts, The Shabby Creek Cottage, The Thrifty Home, The Trendy Treehouse, Topsy Turvy and Twin Dragonfly Designs
Monday, October 1, 2012
Designers Craft Connection Blog Hop - October
Welcome to the Designers Craft Connection Blog Hop for the month of October. This month's theme is Hallowed Homes {Decorating the home for Halloween}.
Living in Southern California, there isn't a big seasonal change in the weather so it is hard to think of Autumn festivities when it is 94 degrees outside. But thanks to this blog hop I threw myself into the Autumn decorating spirit so here is my Halloween cupboard reveal.

I began by covering the back of my antique cupboard with old atlas pages, dictionary pages and music sheets. I did this to give everything a lighter background.
On the top shelf I have my favorite vignette with an old antler and pharmacy bottle.


On the second shelf I have two portraits that I bought several years ago. These were some of the first lenticular haunted portraits I had ever seen. More closeup photos to follow. I also have my paper mache pumpkin displayed with some old laboratory bottles.
The bottom shelf has my glove molds, another laboratory bottle, skeleton keys, vintage plastic pumpkins and my black cat teapot.


Here are closer images of the haunted portraits. They "decompose" right before your eyes. They are the scariest part of my Halloween display.


I hope you enjoyed my Halloween inspired cupboard. Please continue forward or backwards through the blog hop using the blue DCC button on the right column. There are so many inspiring ideas from the many creative designers in this group.
Monday, September 3, 2012
Designers Craft Connection Blog Hop - September
Welcome to the Designers Craft Connection Blog Hop for September. "Vintage Showcase" is the theme this month with the idea to create something that celebrates all things vintage. Normally I would select something vintage and create something from it or repurpose it into something else. But I thought I would do something totally different this time.
 I created a purse {above} that was inspired by an old radiator water bag I found at a garage sale. Below is the inspiration piece.


Sunday, August 5, 2012
Designer Craft Connection - August
Welcome to the Designer Craft Connection Blog Hop for August. This month's theme is designing with school supplies. This was an exciting challenge because I happened to have a lot of vintage school supplies gathered from my thrifting adventures.
My favorite school supply that I collect are old wooden rulers. They look so lovely as they age and are quite varied in their appearance. I began with the idea of covering a lamp shade with rulers but with a bit of luck at my local Goodwill my project became more unique. I began with 24 vintage rulers and a boxy, pink polka dotted lamp {sorry there are no "before" photos} then using hot glue, I attached the rulers to the sides.

My favorite school supply that I collect are old wooden rulers. They look so lovely as they age and are quite varied in their appearance. I began with the idea of covering a lamp shade with rulers but with a bit of luck at my local Goodwill my project became more unique. I began with 24 vintage rulers and a boxy, pink polka dotted lamp {sorry there are no "before" photos} then using hot glue, I attached the rulers to the sides.
Monday, May 7, 2012
Designers Craft Connection Blog Hop – May
Welcome to the Designers Craft Connection Blog Hop. This month's theme was either Jewelry or Flowers. I had an idea combining the two but ran into a bit of a time crunch at the last minute with some additional freelance work. So I moved on to plan B which is technically my plan A since I have been meaning to do this project for some time.
I have been slowly decorating my work area in the office. It is a typical "cubicle" with dull gray fabric partitions and boring office supplies. My first project was purchasing a painter's dropcloth from the hardware store to cover the dull gray fabric walls. I bought the lightest weight dropcloth, 8oz. and 4 ft x 15 ft worked for the size that I needed.
I trimmed the dropcloth and hemmed the edges. I didn't want to attach the material permanently to the cubicle walls so I used the odd clips that they supply to hold things to these walls. But these clips looked horrible so this is where my Flower project came in.

I have been slowly decorating my work area in the office. It is a typical "cubicle" with dull gray fabric partitions and boring office supplies. My first project was purchasing a painter's dropcloth from the hardware store to cover the dull gray fabric walls. I bought the lightest weight dropcloth, 8oz. and 4 ft x 15 ft worked for the size that I needed.
I trimmed the dropcloth and hemmed the edges. I didn't want to attach the material permanently to the cubicle walls so I used the odd clips that they supply to hold things to these walls. But these clips looked horrible so this is where my Flower project came in.
Subscribe to:
Posts (Atom)
