

Showing posts with label 12 Tags of 2012. Show all posts
Showing posts with label 12 Tags of 2012. Show all posts
Thursday, May 17, 2012
12 Tags of 2012 - May...
I really enjoyed working on this tag for the 12 Tags of 2012 challenge for May. I found so many ways to combine thrifted, vintage and repurposed items to complete this project.
Monday, April 9, 2012
12 Tags of 2012 - April
I had a lot of fun creating my April tag for the Tim Holtz 12 Tags of 2012.


This tag was a bit of a challenge in a couple of ways for me. I need to watch more of Tim's videos regarding how he blends inks. When he blends colors they all look so pretty and bright. When I blend colors I tend to get shades of mud. My other challenge was trying to include thrifted elements in the design.
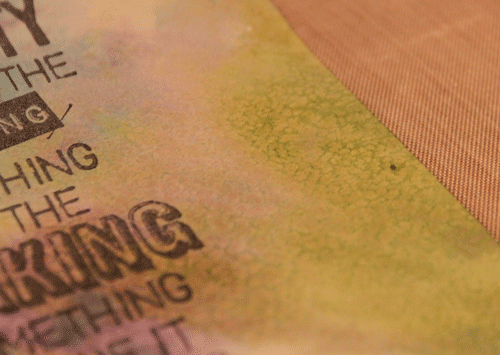
I began by die cutting a tag using the Sizzix Tag & Bookplates die. I used the Fancy Frame Texture Fades to create the embossed pattern in the background. Next, I applied several colors of Distress Inks.
I die cut the bird and branch out of Grungeboard using the Bird Branch die. I trimmed off the bird and inked it separately. I glued the branch to the tag and then used pop-dots beneath the bird to raise it above the branch.

The leaves on the branches are vintage floral leaves that I had thrifted. I used Distress Ink on them to make them look a bit more weathered.

To create the title, I printed the word "Spring" on cardstock then die cut it with the Tattered Banner die. I inked it, folded it and used pop-dots again to give it dimension.

As a final detail I used a thrifted chain, a Trinket Pin and a thrifted amethyst bead as a decorative touch.
This is linked to:
Tuesday, March 6, 2012
12 Tags of 2012 - Retro Flower Power Tag of March
This is the second tag challenge for Tim Holtz's 12 Tags of 2012. I was so excited to start working on the new tag. You can see the inspiration piece on his blog here.
Tim's tag looked like it was inspired by the beginning of Spring, I decided to do a Retro Flower Power version for my tag. As always, I tried to use as many thrifted or vintage items as possible.


You can experiment and get other effects. It tends to look better on darker inks. This is my attempt at a tie-dye effect for my retro tag.
Next I used Alcohol Inks on the clear butterflies. I always like to make my butterflies as symmetrical as possible. I applied the Alcohol Ink on one side and Silver Mixative on the opposite side so that they would not blend.
 The butterfly on the right shows the alcohol ink side up. The one in the middle shows the mixative side up. The one on the left is folded for added dimension.
I began assembling the tag by adhering the Film Strip Ribbon and butterflies to the tag using Glossy Accents. I used the Film Strip ribbon as a "trellis" to visually support my flower. Next, I used a glue gun to adhere the flowers.


Tim's tag looked like it was inspired by the beginning of Spring, I decided to do a Retro Flower Power version for my tag. As always, I tried to use as many thrifted or vintage items as possible.
I first cut the tag out of cardstock using the Sizzix Tag and Bookplates die. I also cut some butterflies out of the recycled clear die packaging using the Mini Butterflies Set. The flowers are all vintage thrifted earrings with their backings cut off.
I first stamped the words using archival black ink. Next, I used Distress Inks in Peeled Paint, Dusty Concord and Stormy Sky and rubbed them on a Non-stick Craft Sheet then lightly spritzed water across all of the colors. I pulled my tag across the inks until I liked how it looked. While the inks were wet, I quickly sprinkled salt across the surface. The salt causes a resist effect with the water and when the ink dries there is a subtle but interesting texture.

Salt on the surface

After the ink dries and the salt is completely brushed away
Another example of the salt effect on the ink
Next I used Alcohol Inks on the clear butterflies. I always like to make my butterflies as symmetrical as possible. I applied the Alcohol Ink on one side and Silver Mixative on the opposite side so that they would not blend.

I began assembling the tag by adhering the Film Strip Ribbon and butterflies to the tag using Glossy Accents. I used the Film Strip ribbon as a "trellis" to visually support my flower. Next, I used a glue gun to adhere the flowers.


I used a thrifted piece of vintage Rayon seam binding for the ribbon. I laid it on the Craft Sheet and rubbed the Peeled Paint Distress Ink pad across it. Then I crunched it up and used it to wipe up any excess ink on the Craft Sheet. This created the wrinkled, distressed look on the ribbon.
I'm having a great time playing in the Studio.
This is linked to:
Sunday, February 26, 2012
Tim Holtz 12 Tags of 2012 - February
As most of you who Follow my blog have realized by now, I have been in a creative slump. Blame it on being busy at work or freelance design jobs or life in general but I just haven't had the inspiration to create anything in a while.
Well leave it to the every-inspiring Tim Holtz to come along with the perfect kick start to get the creative juices flowing. He has started the 12 Tags of 2012. Check it out and join along if you are so inspired.
Starting with his tags as the inspiration, my goal will be to create all of these tags using thrifted and vintage elements as much as possible although I have a ton of his product to include as well.
The February Tag:

I began with pink cardstock that I embossed with the Valentine Background Texture Fade. I rubbed wax over the raised words then sprayed it with Candy Apple Red Glimmer Mist. The wax acted as a resist to the Glimmer Mist. I wanted to highlight the letters a little more so I used a brayer and rolled on white acrylic paint in some areas.
I die cut the cupid out of Grunge Paper using the Love Struck die by Sizzix. I painted it with red acrylic and added some thrifted glitter.
Tim used two strips of the Vintage Lace Decorative Strip die cut but because I used real Scrabble Tiles for the words I didn't have enough room to place two strips on my tag. So I added one strip along the bottom as a decorative edge.
 I made this Vintage Lace decorative edge by using a sheet of thrifted vintage music. It was too fragile to be used alone so I applied some Tissue Tape along the back to add stability before I die cut it. I further "aged" the sheet music with Tea Dyed Distress Ink.
Because the Heart was the focal point of the tag and I didn't have the honeycomb paper that he used I had to dig through my thrifted stash. I found a silver heart and hand-gathered some old lace into a ruffle to go around the heart.
 I had the Trinket Pin and the Philosophy Tag in my stash. Among my thrifted treasures I found a vintage earring that added the perfect finishing sparkle to the piece.
 I attached the Scrabble tiles in a crooked manner because I liked the playful appearance. The cupid is attached using glue dots that raise it above the card surface for a little dimension.
This has been a great inspiration to get back into the art of creating something everyday. Thanks Tim!
This is linked to:
Craft Envy, Home Savvy A to Z, Homemaker on a Dime, I {heart} Naptime, Marvelously Messy, Sew Can Do, Singing Three Little Birds, Skip to My Lou, The Girl Creative and The Southern Institute
Well leave it to the every-inspiring Tim Holtz to come along with the perfect kick start to get the creative juices flowing. He has started the 12 Tags of 2012. Check it out and join along if you are so inspired.
Starting with his tags as the inspiration, my goal will be to create all of these tags using thrifted and vintage elements as much as possible although I have a ton of his product to include as well.
The February Tag:
I began with pink cardstock that I embossed with the Valentine Background Texture Fade. I rubbed wax over the raised words then sprayed it with Candy Apple Red Glimmer Mist. The wax acted as a resist to the Glimmer Mist. I wanted to highlight the letters a little more so I used a brayer and rolled on white acrylic paint in some areas.
I die cut the cupid out of Grunge Paper using the Love Struck die by Sizzix. I painted it with red acrylic and added some thrifted glitter.
Tim used two strips of the Vintage Lace Decorative Strip die cut but because I used real Scrabble Tiles for the words I didn't have enough room to place two strips on my tag. So I added one strip along the bottom as a decorative edge.

Because the Heart was the focal point of the tag and I didn't have the honeycomb paper that he used I had to dig through my thrifted stash. I found a silver heart and hand-gathered some old lace into a ruffle to go around the heart.


This has been a great inspiration to get back into the art of creating something everyday. Thanks Tim!
This is linked to:
Craft Envy, Home Savvy A to Z, Homemaker on a Dime, I {heart} Naptime, Marvelously Messy, Sew Can Do, Singing Three Little Birds, Skip to My Lou, The Girl Creative and The Southern Institute
Subscribe to:
Posts (Atom)