Tuesday, August 31, 2010

Type Tray Flowers


Today I Created | Flowers for my type tray.

The background image, both inside the type tray and used on the grunge flowers, is of pink tulips that my boyfriend had sent to me. They were a very bright pink and the colors were too vivid for my design. I used Photoshop to soften the colors and printed out the background image and a larger version that I applied to some Grungepaper.

I cut the flowers using the Tim Holtz Tattered Flower die. Then I inked and stamped them to wear them down a bit. I used Perfect Pearls in a copper color to decorate the petals.

I used Pearl Brads from s.e.i. for the flower centers. On the larger flower I used a round piece of chipboard that had a shiny coating then applied Crackle Paint in Old Paper. The paint crackled but when I tried to ink it some of the paint chipped off. I sprayed Glimmer Mist in Iridescent Gold to hold the paint on the chipboard.

Behind the flowers in the type tray is an old cigarette card of a rose. I collect cigarette cards and the old roses are one of my favorite designs.

Monday, August 30, 2010

The Beginning of the Story of Me

Today I Created | The beginning of my Type Tray Project.

I was so excited when I found this type tray by 7 Gypsies but I was unsure of what story I wanted to tell with this. I decided to tell the story of Me; who I love, what I enjoy and bits of memories.

Since this became a larger project than I could create in one day, I decided to create a little bit at a time over several days. So I will post photos of my work in progress as I create a little Story of Me.

This detail shot shows my favorite image from the Cosmo Cricket, Nutmeg Elements paper. I have fond childhood memories of staring into the fireplace and letting my imagination wander. I am also going to use a Tim Holtz Philosophy Tag.

Sunday, August 29, 2010

Old School Organizing


Today I Created | Rollodex cards

I bought a Rollodex at a garage sale the other day. The seller complimented me for being "old school" in my organizing choice. I have been playing with the concept of organizing my phone contacts but in an altered, creative way. New Rollodex systems are rather expensive for something that I was just going to experiment with but for $1 I couldn't go wrong.

This card is for my friend, Holly. I had saved her new address torn from the Christmas card envelope. I wanted to incorporate the actual ephemera plus I added the holly sticker as a quick visual clue. Holly is also a writer so I added the typewriter tape from cutetapes.com.

This is the first of many cards that I plan to create.

Saturday, August 28, 2010

Another Disk Experiment


Today I Created | A stamp-resist, alcohol ink disk.

I applied alcohol inks on a clear CD disk. Next I used Archival ink (black, but any color will do) to stamp on top of the alcohol inks. I used a fairly solid pattern of rubber stamp as the design.

Immediately after applying the rubber stamp ink I rubbed it off with a paper towel. The rubber stamp ink and the alcohol ink lifted off of the plastic leaving a clear area.

I love this technique.

Friday, August 27, 2010

Alcohol Ink experiment

Today I Created | A decorated CD using alcohol inks.

I like creating things out of recycled items. I found that there are unprinted blank CDs used in packaging the unwritten blank CDs. These seemed like the perfect medium to create art using alcohol inks.

On this sample I applied alcohol inks and then rubber stamped a swirl pattern with StazOn blank ink. On the opposite side I applied a thick coating of Rock Candy crackle paint. This wasn't as visually interesting as I had hoped. I stamped brown ink on top of the dried crackle paint to add interest.

I learned that crackle paint works best on porous surfaces.

Thursday, August 26, 2010

Laguna Seca Scrapbook Page

Today I Created | A stenciled scrapbook page.

I find that I enjoy the technique of Glimmer Mist spray. For this page I used a pre-cut diecut piece of paper as a full-page stencil. I used bits of doublesided tape to hold it on my page and then applied Glimmer Mist.

I knew that I was going to add the photo across the center so I concentrated the spray above and below where the photo would be placed.

The photo was created by using the Photomerge feature in Photoshop and "stitching" three photos together to create the panoramic shot.

Wednesday, August 25, 2010

Squirrel Tag

Today I Created | A Squirrel Tag

There is a story behind this squirrel tag. It involves a wedding reception, a squirrel and pinecones but the relevant part is that my friend wanted to use a squirrel diecut as a humorous gift for her mother-in-law.

I offered to decorate the tag before the squirrel was applied as decoration.

I cut the tag, squirrel and oak leaves using the eclips. I used the tree bark Texture Fade to create the surface texture. Then I sprayed several layers of Glimmer Mist and rubbed some ink to add a bit more color.

Tuesday, August 24, 2010

Masthead


Today I Created | A New Masthead for my Blog

I couldn't decide how I wanted my masthead to appear. I like bright colors but it would be too garish for this blog. I wanted something that meant something to me but I like so many different styles.

I decided that I could create a masthead and if I didn't like it then I could always create a different one later.

There is some symbolism involved in this masthead. The shape in the middle is a scan of an old transportation map of London I recently bought at the Rosebowl Swapmeet. I am an Anglophile so having a bit of England in my masthead seemed appropriate.

I also included the image of a swan. This is in reference to the story of the Ugly Duckling. 

I'm sure the masthead will change again. I just need to decide what story I want it to tell. But for today, I created a new masthead.

Monday, August 23, 2010

Handmade Envelope

Today I Created | An envelope die cut from handmade paper.

I found the handmade paper at CostPlus sold as wrapping paper. It is a very heavy stock with unique patterns printed on it. I wanted to use it to die cut some envelopes. The #10 Envelope die was extra large but the heavy paper cut it beautifully.

Out of the entire roll of wrapping paper, I was able to only cut two large envelopes. I saved the leftover paper to make tags or other bits of art.

I made these as a gift for my sister who enjoys the fine art of letter writing. She can either create an address label or paint an area on the front so that the address can be read clearly. I will let her embellish it as she desires.

Sunday, August 22, 2010

Royal Tag


Today I Created | A tag with a royal theme.

I had two die cut shapes of decorative flourishes in a cross shape but didn't have any idea of how to use it. I placed the contrasting colored center of one into the other creating a two-tone flourish. It was a little large for my tag but I decided to use it and let the edges hang over.

I sprayed Glimmer Mist on the tag before I attached the flourish die cut. I used clear ink to stamp the lion image and then applied gold Perfect Pearls. I then used alcohol ink to turn the clear rhinestones into an amber color and then apply them to the tag.

Since the lion and the flourish had a "royal" feel to it, I placed it on a page from an old book about Queen Victoria.

Saturday, August 21, 2010

Festive Pinwheels


Today I created | A Series of Pinwheels

I just wanted to create something basic and simple today. This was a good way to use some of my Basic Grey stash and try something new.

I cut the paper into 5" squares and cut a 2" diagonal line from the corners towards the center point. I punched a small hole in the center and on one tip of each corner. I then used a small brad to hold it all together and placed a button on top of the brad to finish off the look.

These pinwheels are just decorations since they don't actually spin. They would make very nice party decorations.

Friday, August 20, 2010

Birthday Card


Today I created | A 22nd Birthday card.

I'm still playing with the Tim Holtz Texture Fades but this time it was his Bingo card design. I chose one number and cut it out of the background. I put it into the Tag Maker and then attached it with double-stick foam tape so it floated over the background.

I might play with it some more and distress it further. This was a very simple card but I liked playing with the visual dimension part.

Thursday, August 19, 2010

Crafty Create-A-Bow


Today I created | Some easy crafty gift bows

I admit that I am not very good at tying bows. I would much rather buy pre-made bows and just stick them on gifts. Not a very creative solution but efficient.

I tried using the Sizzix, Create-A-Bow die today. I create both of these bows and had fun doing it.

It is best to use two-sided, printed paper because everything shows. On the purple bow I sprayed it with gold Glimmer Mist. This worked well on the darker paper.

Wednesday, August 18, 2010

Butterfly Collection


Today I created | A butterfly collection.

No butterflies were harmed in the making of this art. I like making cards out of these paper-punched butterflies. It is a great project to use scraps of paper with tiny prints.

My favorite part is making sure that the pattern of the paper appears symmetrical on the butterfly wings. I mount the butterflies using double-stick foam dots to make them float on the background.

I used paper in a color combination of teal and pink. Not a combination that I would normally use together.

Tuesday, August 17, 2010

Dreams do come true

Today I created | A memorable scrapbook page.

Ever since I learned about the Craft and Hobby Association trade shows, I had always dreamt of attending. It is open only to members of the craft industry and retailers. Then one day I began working in the craft industry and experienced my first CHA show. I thought it was the most exciting thing that could happen in my "scrapbooking" world.

Then earlier this year, I was invited to attend a dinner with Tim Holtz at Disneyland. Okay, so I thought this was the most exciting thing that could happen. Me, Tim and a handful of co-workers.

Well last month Tim stopped by our office. I had designed his catalog so he came by to take a look. He greeted me with a hug. I have to say, this has to be THE most exciting thing that could happen.

This scrapbook page has a photo of Tim, E.L. and me taken by Mario. My catalog is in front of us. I used the buttons and Rosette pieces I made. I included an envelope he had sent to me. Everything is slightly distressed including E.L. and me because we had been working so hard on his projects.

Good times! Happy Scrapper!

Monday, August 16, 2010

Tree Banner

Today I created | A Banner made from upside-down, die cut trees.

I cut these Christmas tree shapes using the eclips but noticed that they had such a nice form when seen upside down. I immediately thought of pennant banners. The only thing I had to revise was to trim down the star at the top of the tree.

You can see the Christmas tree shape if you view the banner upside down.

Sunday, August 15, 2010

Birthday Layout


Today I created | A scrapbook page for my son's birthday.

I was going to make a birthday card but then I realized that I would just end up putting it on a scrapbook page. I decided to make a page that WAS the card.

Luckily my son is used to me scrapbooking everything so he will enjoy this as a card.

The photos are of the cars he has owned so far. Placing all of these photos on a page made it look like a car dealership lot. I added the flags just to play up the car lot theme. The flags spell out his name. The brown paper is printed with tire tread marks. The journal card has his birthday and month circled.

Saturday, August 14, 2010

Christmas Tag

Today I created | A Christmas tag

I'm really beginning to enjoy making tags. I think of them as little bits of art.

This reindeer Christmas tag was first inked with red and black along the edges. Then I embossed it and applied green paint with a brayer.

Previously I had embossed the tag and then added the inked edges but I experimented with adding the ink before embossing. This technique allowed the "valleys" between the raised parts to show more color from the ink.

The reindeer and tag were cut using the eclips. The embossed texture is from a Tim Holtz Texture Fade.

Friday, August 13, 2010

85th Belated Page

Today I created | A scrapbook page celebrating my father's 85th birthday.

My father passed several years ago so he never got to see this completed. I wanted to make the page bright and cheerful since he was such a warm and good person.

On the positive side: I finally completed this page.
On the negative side: I'm only six years behind in my scrapbooking. Well, that is if you don't count all of the heritage pages going back to the early 1900s that I still want to complete.

But today I created this page and I am thrilled.


Thursday, August 12, 2010

Celebrate Spring

Today I created | A tag to celebrate Spring.

I know that it is the middle of Summer but with colors like bright green and lavender it just feels like Spring.

I played with Glimmer Mists and first sprayed light green and lavender on a blank tag. I then, carefully attached a "mask" cut from an eclips diecut and sprayed a darker green to create the leaves.

The flower was created by spraying Glimmer Mist on two blank Prima flowers. I stamped on the larger flower for additional interest. I then stacked them and added the button.

This tag gave me a great excuse to use colors and embellishments that I don't normally use in my scrapbooking projects.

Wednesday, August 11, 2010

Fast Flowers


Today I created | A mass of diecut paper flowers.

It is my co-worker's birthday next week. I wanted to create something to decorate her desk. She likes the color combination of teal and orange.

I cut a bunch of flowers in different shapes and sizes using the eclips and then stacked them in three layers. Since these didn't need to be archival, I stapled the layers together.

Tuesday, August 10, 2010

Halloween Tag


Today I created | An embossed Halloween tag.

I'm not a big "tag maker". I've never made a tag before.

This tag was cut using the eclips shape cutter. I embossed the spider web using one of the new Tim Holtz Texture Fades. Next I inked and painted and added Perfect Pearls and inked some more until it looked pretty distressed. I stamped the words "Happy Halloween" on adhesive-backed, cotton tape from cutetape.com. The hole reinforcer is also from cutetape.com.

The key might be a real skeleton key that I had in my stash. I curled some wire and used it to attach the key. I tied it off with some green velvet ribbon.

Lots of work for one tag. But since the purpose of this Blog is to stretch my creative wings and try new things then this all made sense. Tags are perfect little "canvases" for art to be created and then given away.

Monday, August 9, 2010

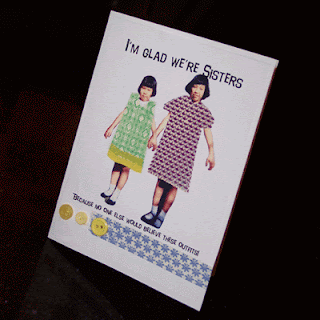
Collage


Today I created | A collage.

I used to love doing collages. They were fun and spontaneous and usually had unexpected results.

I had found these dress-up stickers by Little Yellow Bicycle and immediately thought of this one particular photo of my sister and I. Our mom used to sew all of our clothes and sometimes would make us dress up and pose for photos. Mom was a really good seamstress but my sister and I were not necessarily the best fashion models.

I made this card for my sister because only she would enjoy this memory as much as me.

Sunday, August 8, 2010

Shiny Brite Ornament Collection


Today I created | A Shiny Brite Christmas Ornament Collection.

We went to the Rosebowl Swapmeet today. I found most of these ornaments there. I had a few old glass ornaments before today but I didn't feel like that was actually a "collection". Today I found enough to qualify as something that I now collect.

I remember my parents had several boxes of the plain, red Shiny Brite ornaments for our tree every year. It was a very traditional look.

I enjoy a very eclectic assortment of ornaments so these will be mixed in with my very odd lot of decorations this year.

Saturday, August 7, 2010

Postcard Card


Today I created | An embossed Postcard using a Tim Holtz Texture Fade by Sizzix and Core'dinations paper.

I have had this unused paper in my stash for a while so it seemed like a good time to pull it out and use it. The Texture Fade hasn't been released to the market yet but I made this paper to play with.

After embossing, I sanded the paper but it wasn't enough. I inked the edges and still wasn't happy. I finally used some Crackle paint and reinked parts to make it look interesting enough.

The tape is from cutetape.com. The butterfly is a paper punch. The charm is from my Tim Holtz stash.

Friday, August 6, 2010

Distressed Rosettes


Today I created | Distressed Rosettes using pins that Mario Rossi sent me and the Paper Rosette die. Thanks Mario!

After I created the dark blue rosettes yesterday I picked up a pin and noticed how perfectly it would fit in the middle of the rosette. Tim Holtz pins + Tim Holtz die + distressed techniques = today's creations.

Three rosettes were cut from printed paper. Three from Core'dinations paper that was sanded. And three were from Bazzill paper that was distressed with ink.

Thursday, August 5, 2010

Something Created Today

The challenge of this blog is to create something everyday. It doesn't sound like a difficult task when you're a graphic designer but designing something for work isn't always as creative as designing something for yourself.

For work I design advertising, packaging and catalogs. The creative parts happen when I create concepts for ads. The design parts happen when I organize pictures and words into a nice design.

For fun I design scrapbooks. I have been scrapbooking for 22 years and still have a passion for the craft.

Today I take on the challenge to create something everyday so that I can stretch my wings and try something new. Thank you for joining me through these creative life lessons and I hope you enjoy watching me learn something new.

Today I Created | A blog.

I also created some Paper Rosettes. These are from the new Tim Holtz Sizzix die. These were just a test sample to see what they would look like. These have inspired me to create something else using this die. Maybe tomorrow's project.
Related Posts Plugin for WordPress, Blogger...